
Organizations
An organization brings the people of a company or a health department together in landplan.io. It has its own members and roles, its own settings and letterhead, and, for a company, its own plan, seats and price book.
There are two kinds:
| Type | For | What it has |
|---|---|---|
| Company | A design firm or installer | Team and Enterprise plans, paid seats, a price book, partner API keys |
| Agency | A health department | Free. Inspectors, districts and a review inbox |
Your own work stays yours: your account and your personal projects are not part of the organization.
Open your organization
The organization pages are at landplan.io/org. To open them, click the workspace button in the top bar (it shows your initials and Personal, or the organization's name) and choose Organization settings.
The same menu lists your Workspaces and has Create organization.
If you are not in an organization, the page says You're not in an organization, with Create organization. To join one, ask its Owner or Admin to invite you.
The pages have a side menu. What you see in it depends on the type of organization and on your role:
| Entry | Shows for |
|---|---|
| Overview | Everyone |
| Members | Everyone |
| Roles | Everyone |
| Districts | Agencies |
| Reviews | Agencies |
| Price book | Companies |
| Billing | Companies, for the roles that can see billing (Owner, Admin, Billing) |
| Settings | The roles that can change settings (Owner, Admin) |
| API keys | The roles that manage API keys (Owner, Admin) |
| Audit log | The roles that see the audit log (Owner, Admin) |
Create an organization
- Click the workspace button in the top bar and choose Create organization.
- Give it a Name and pick the Type: Company or Agency.
- Click Create. You become its Owner.
A company then picks its plan in Plan & seats: a Team plan (monthly, or annual for a lower price) with a free trial and no card needed, a subscription paid by card now, or Choose later. Enterprise is set up with us: click Talk to us.
landplan.io confirms a new agency before it can invite people. Until then a note at the top says so, and you can fill in its settings. We email you once it is confirmed.
Join an organization
When someone invites you, you get an email with a link. The link opens a page that names the organization and your role.
- Click Sign in to accept, with the email address the invitation was sent to. If you have no account yet, click Create an account.
- Click Join organization, or Decline.
Overview
Overview shows how far the organization's setup has got, and what changed lately.
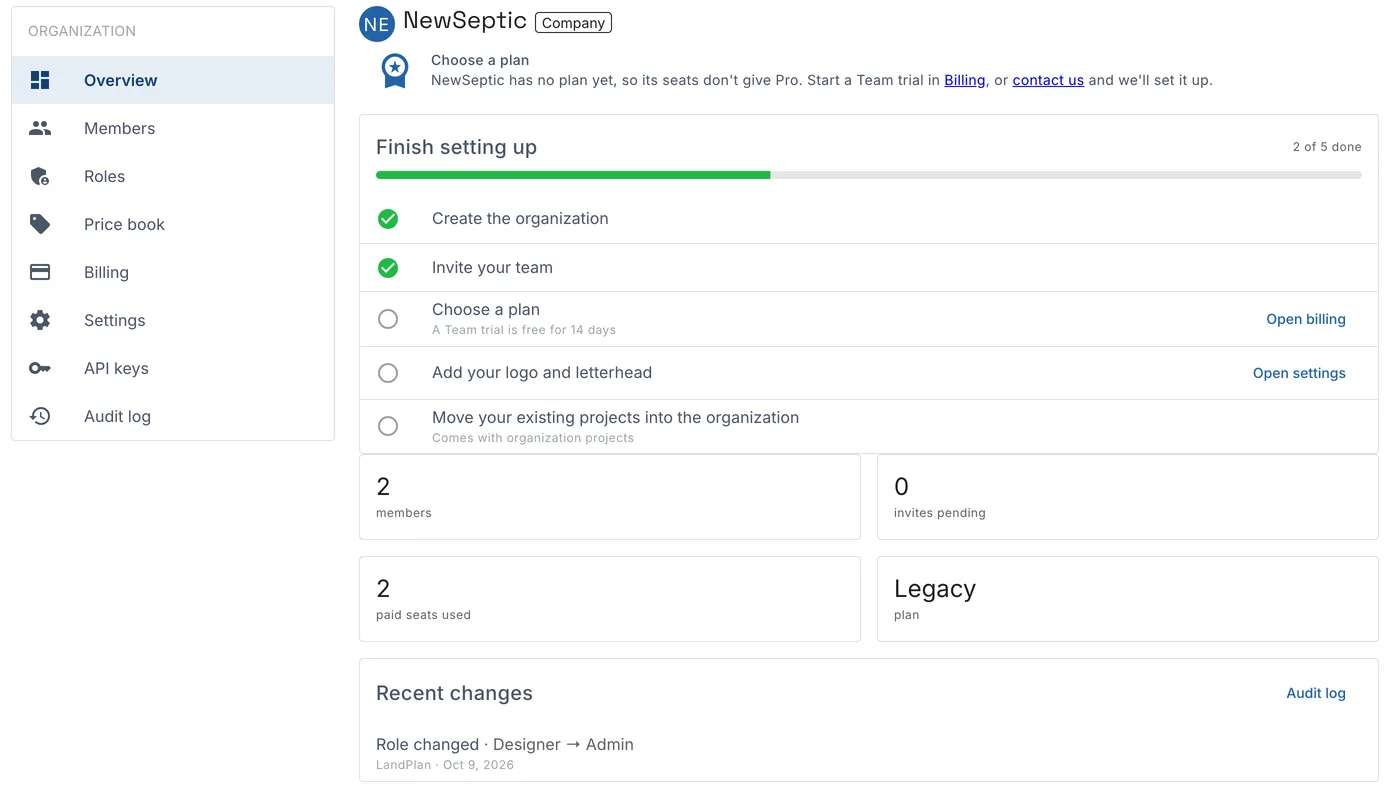
Finish setting up is a checklist, with a bar and 2 of 5 done:
| Step | Done when |
|---|---|
| Create the organization | Always done. |
| Invite your team (an agency: Invite your inspectors) | Someone else is a member, or an invite is pending. Invite people opens Members. |
| Choose a plan | A company has a plan. A Team trial is free for 14 days. Open billing opens Billing. |
| Add your logo and letterhead (an agency: Add your letterhead and review stamp) | The letterhead is filled in. Open settings opens Settings. |
| Move your existing projects into the organization | Comes with organization projects. |
Under it, tiles count the members, the invites pending, the paid seats used and the plan. Recent changes lists the last changes, with Audit log to see them all.
A company without a plan sees a note at the top: its seats don't give Pro until it has one.
Members
Members lists the people in the organization and the invites still pending.
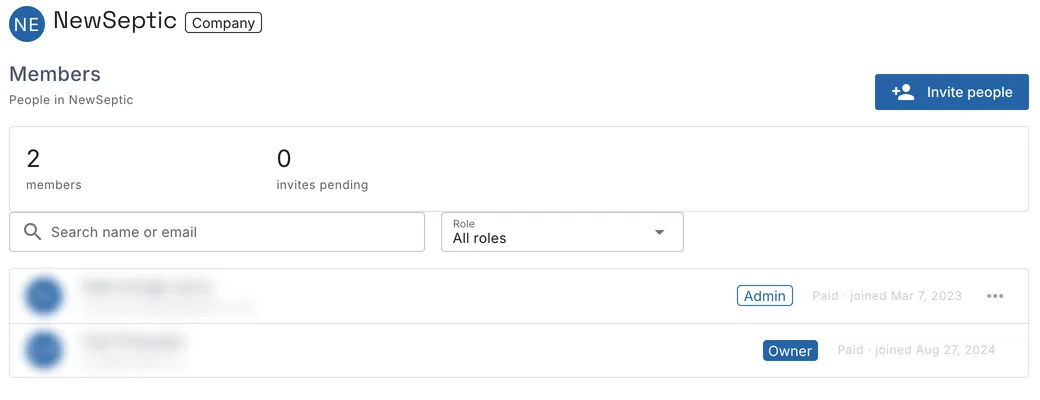
- Search name or email and the Role filter narrow the list.
- Each row shows the person's role, whether they use a paid or a free seat, and when they joined.
- The ⋯ button of a row has what you may do: Change role, Remove from organization, or, on your own row, Leave organization.
An Admin can't change or remove the Owner, and can't make anyone Owner. When someone is removed, you pick who Takes over the organization projects.
Pending invites lists the invites not yet accepted, marked Invited or Expired. Click Resend or Revoke.
Invite people
- Click Invite people.
- Under Email addresses, paste a list or press Enter after each address. You can invite up to 20 at a time.
- Pick the Role. Each role says whether it uses a paid or a free seat.
- Add a Personal note (optional), then click Send invite.
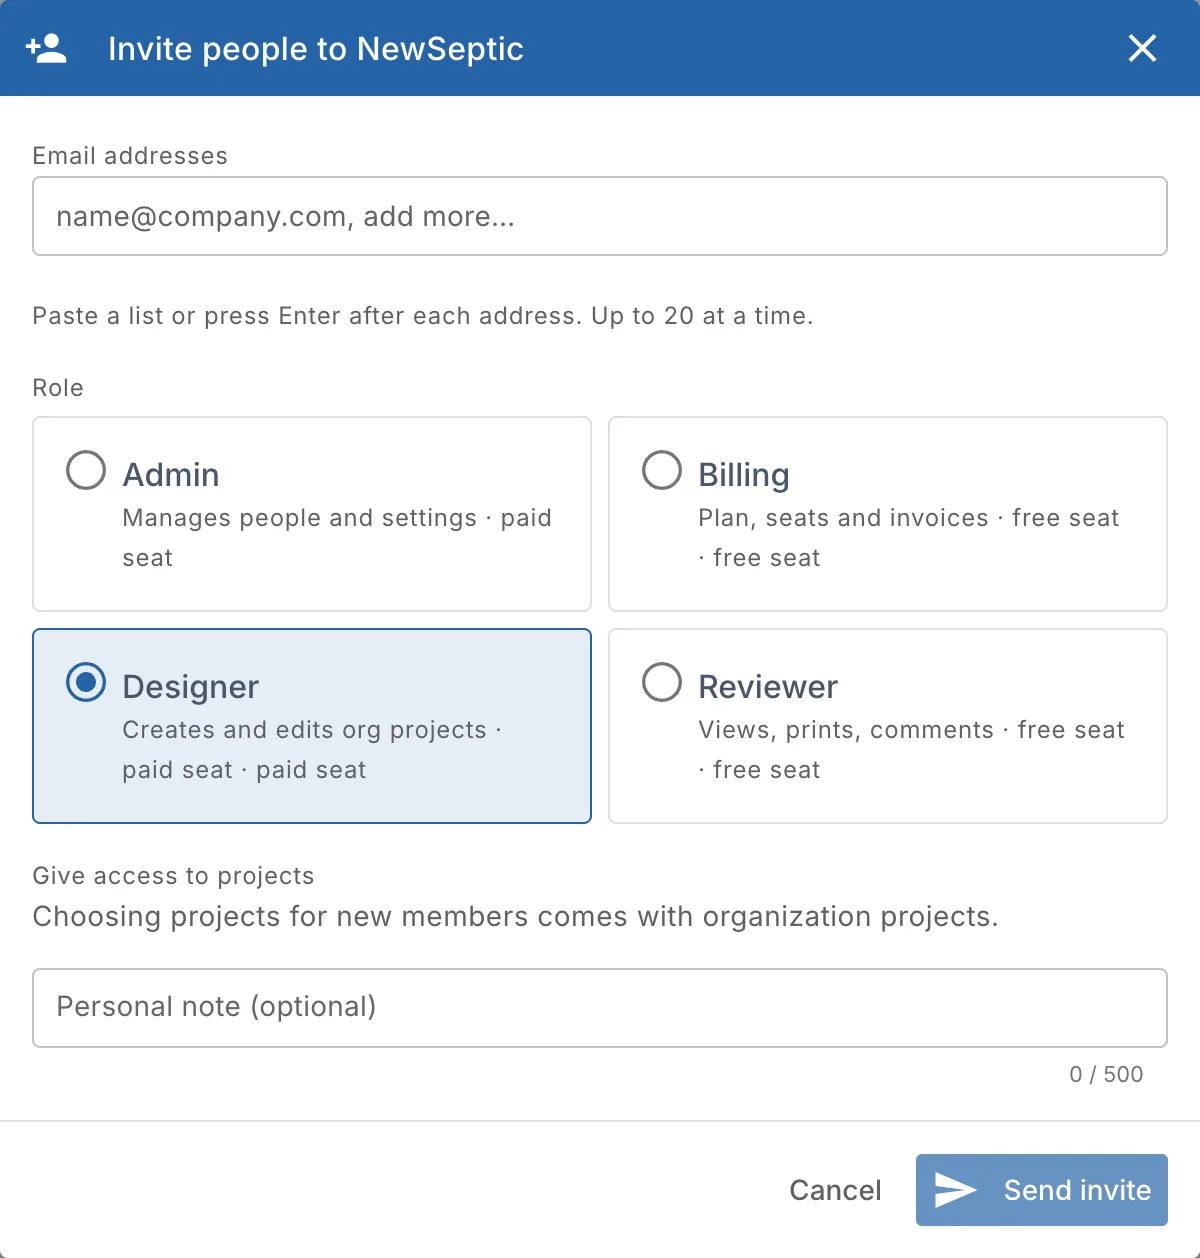
Each person gets an email with a link to join. See Join an organization.
Roles
Roles shows what each role can do. Custom roles come with Enterprise.
| Role | Type | What it is for | Seat |
|---|---|---|---|
| Owner | Both | Everything, including billing and closing the organization | Paid (company) |
| Admin | Both | Manages people and settings | Paid (company) |
| Billing | Company | Plan, seats and invoices | Free |
| Designer | Company | Creates and edits org projects | Paid |
| Reviewer | Both | Views, prints and comments | Free |
| Guest | Company | Only the projects they are given, on their own plan | Free |
| Inspector | Agency | Reviews and signs reports, and can be given townships | Free |
For a company, the table lists, per role: See org projects, Create and edit org projects, Archive, delete, transfer projects, Print and comment, Spend org credits, Billing and seats, Partner API keys (Enterprise), Invite and remove people, Change roles, Settings and letterhead, Audit log, Transfer ownership, close the organization and Uses a paid seat. The last row counts the People with this role.
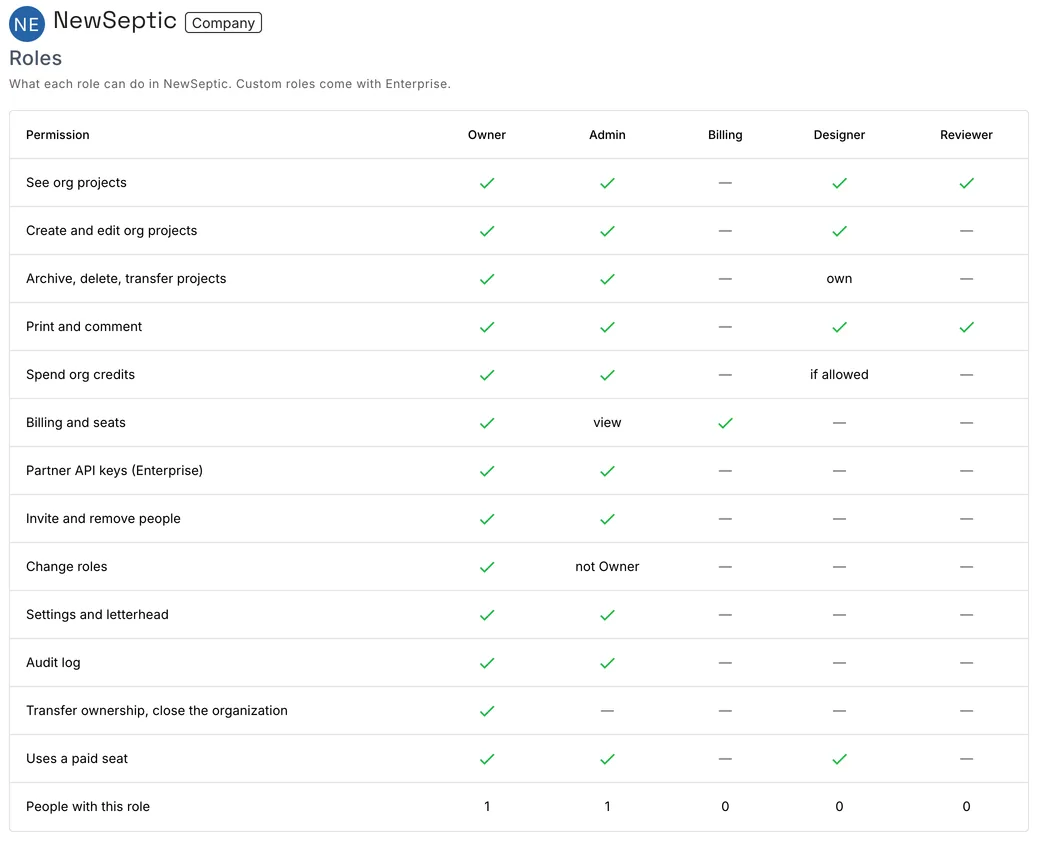
A few cells need a word:
- own: a Designer archives, deletes and transfers only their own projects.
- if allowed: a Designer spends org credits only when Designers can spend shared credits is on in Settings.
- view: an Admin sees billing but doesn't change it.
- not Owner: an Admin changes roles, but never the Owner's, and never to Owner.
All agency seats are free. An agency's table lists See the agency's reviews and shared projects, Review, mark up, stamp and sign reports, Can be given townships and Manage districts, print the district map.
Price book and defaults
A company's Price book sets the prices and design defaults for every designer in it. Changes apply to new estimates; existing projects keep their prices.
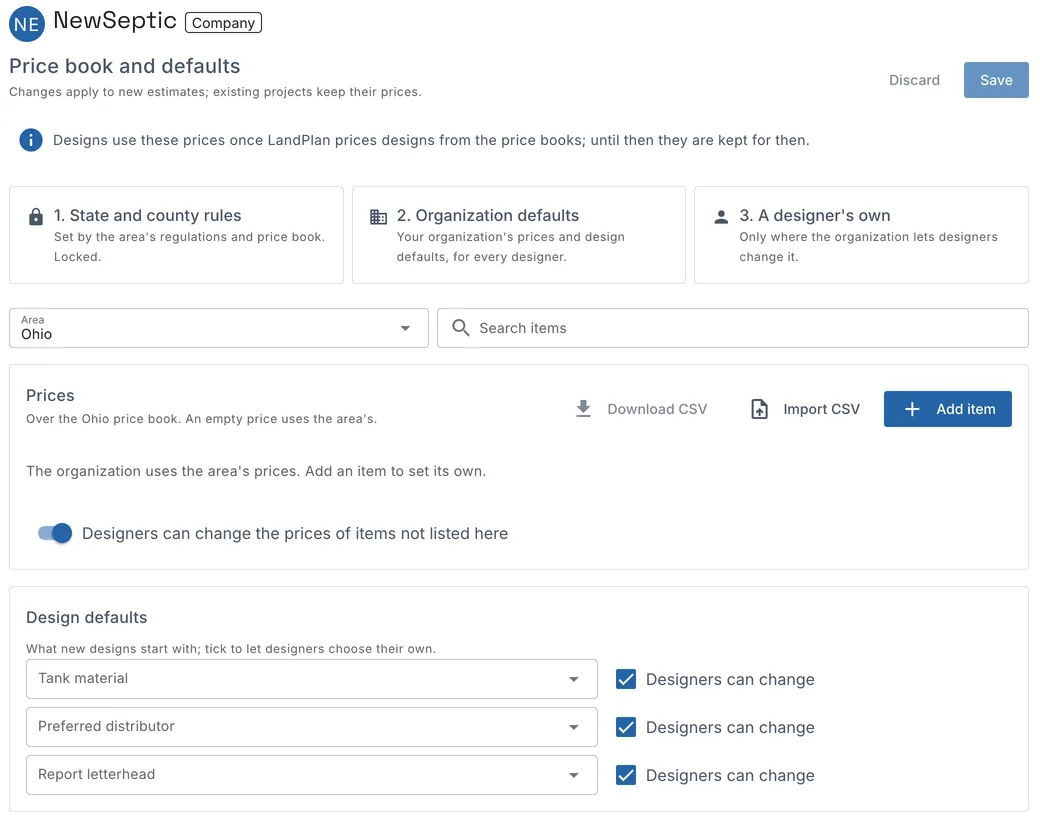
Prices come in three layers, shown at the top:
| Layer | What it is |
|---|---|
| 1. State and county rules | Set by the area's regulations and price book. Locked. |
| 2. Organization defaults | Your organization's prices and design defaults, for every designer. |
| 3. A designer's own | Only where the organization lets designers change it. |
Prices:
- Pick the Area. The prices sit over that area's price book; an empty price uses the area's.
- Click Add item to set a price of your own, or change one in the list. Search items finds them.
- Click Save. Discard drops your changes.
Download CSV and Import CSV move the list in and out of a spreadsheet. The switch Designers can change the prices of items not listed here decides whether designers may set their own prices for everything else.
Design defaults are what new designs start with: Tank material, Preferred distributor and Report letterhead. Tick Designers can change beside one to let designers choose their own.
Only an Owner or Admin changes the price book. Others see it read-only. A designer sets their own prices in Design setup.
Billing
A company's Billing page holds its plan, seats, payment methods, shared credits and receipts. Compare plans opens the plans page.
| Part | What's in it |
|---|---|
| Plan | The plan and its status (Active, Trial, Past due, Read-only), the paid seats in use, Change seats, and Cancel plan or Resume plan. A seat change waiting for the renewal shows with Undo. |
| Next invoice | The date and amount of the next bill. |
| Payment methods | The cards on file, with Add, Make default and Remove. |
| Shared credits | The project credits the organization shares, with Buy credits. Designers spend them when they are allowed to. |
| Receipts | The Date, Description, Amount and Status of each payment, with a PDF. |
A company with no plan picks one here: a Team trial or a subscription. See Create an organization.
Only the Owner and Billing members change billing. An Admin sees the plan and invoices, with a note that says so. If a payment fails, a banner at the top of every organization page says so, with a button to fix it.
For your own plan, see Billing.
Settings
Settings holds the organization's profile, its letterhead and its policies. Click Save changes when you are done.
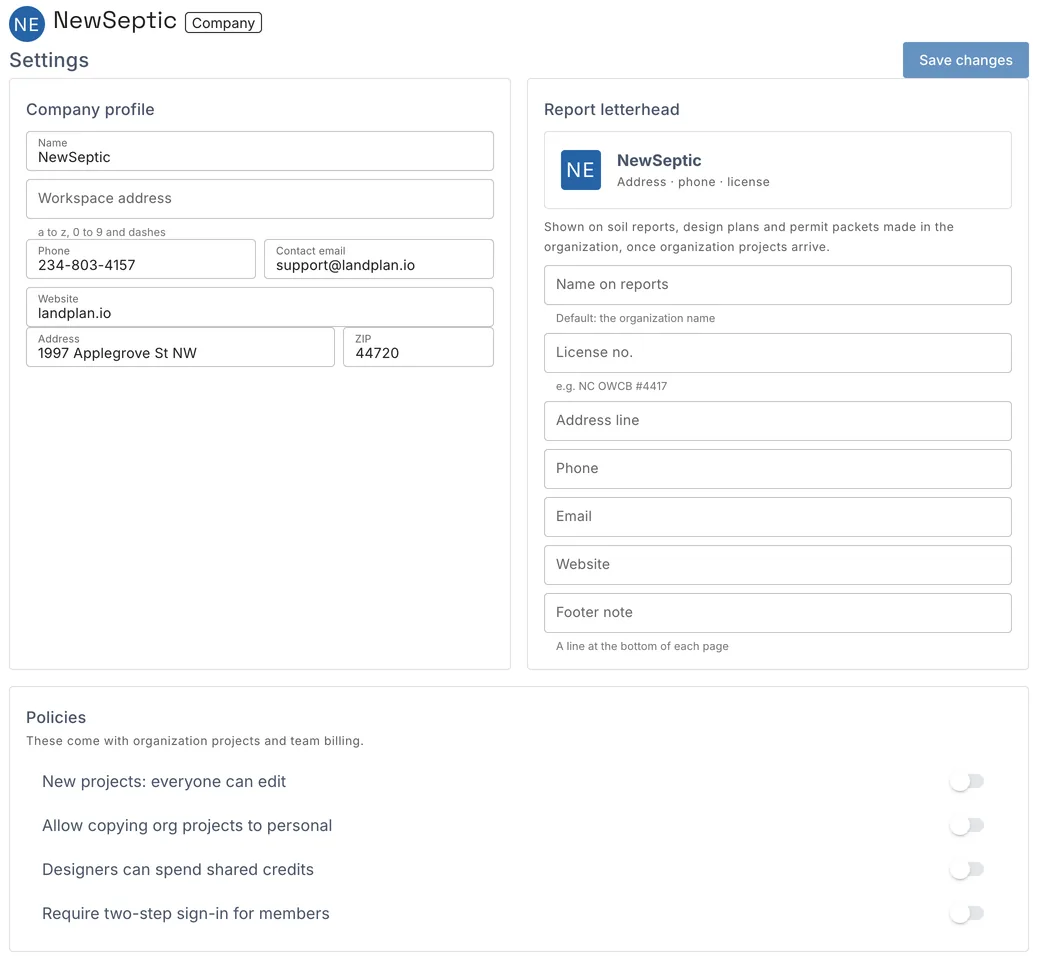
| Part | Fields |
|---|---|
| Company profile (an agency: Agency profile) | Name, Workspace address (landplan.io/o/… : a to z, 0 to 9 and dashes), Phone, Contact email, Website, Address, ZIP |
| Report letterhead (an agency: Letterhead and review stamp) | Name on reports (the organization's name if empty), License no., Address line, Phone, Email, Website, Footer note (a line at the bottom of each page), with a preview |
| Policies | New projects: everyone can edit, Allow copying org projects to personal, Designers can spend shared credits, Require two-step sign-in for members |
The letterhead is shown on soil reports, design plans and permit packets made in the organization, once organization projects arrive. The policies come with organization projects and team billing.
The Owner also sees the Danger zone:
- Transfer ownership makes another member the Owner. You become an Admin.
- Close organization removes everyone. Accounts and personal projects stay.
Data map
Data map shows the organization's features on one map, across all of its projects. The page shows only what you may see: Owners and Admins see everything, and other members see what Data access gives them, plus their own features. See Data map.
Data access
Data access decides, for each member, what they see on the organization's data map. Only Owners and Admins see this page. Owners and Admins themselves always see everything.
For each member, choose under Data:
| Choice | The member sees |
|---|---|
| Their own features | Only what they drew (the default) |
| All layers | Every feature of the organization |
| Some layers | The layers you pick under Layers, such as Septic tank and Distribution bed, plus their own features |
Turn on Counts to let the member see the organization's counts: features created, edited and deleted. Then click Save on that row.
A member who leaves the organization loses this access.
API keys
API keys are keys for the landplan.io partner API that act as the organization: they reach the organization's projects, never a member's personal ones. API access is part of Enterprise. Without it, the page offers Ask about Enterprise and What the API does.
On Enterprise, Owners and Admins:
- Create a key with New API key: give it a Name, the Scopes and, if you like, Allowed addresses, when it Expires and its limits, then click Issue key. The key is shown once: click Copy, then I've copied it.
- See each key's Mode (test or live), Status and Scopes in the list.
- See Usage this month: the units and calls used. Live calls are metered and invoiced to the organization.
- Rotate a key: a new key is made and the old one keeps working for a while, so you can move your systems over without downtime.
- Revoke a key that is no longer needed.
See Partner API for what the API does and how to call it. A key with the wfs:edit (or wfs:read) scope opens the organization's maps in QGIS: see Edit your maps in QGIS.
Audit log
Audit log lists every change to the organization: people, roles, invites, settings and plan.
| Column | What it shows |
|---|---|
| When | The date and time |
| Who | Who made the change. (LandPlan) after a name means the landplan.io team. |
| What | The change, for example Role changed |
| Member | The person it was about |
| Details | For example Designer → Admin |
Show 25, 50 or 100 rows a page.
Districts
An agency's Districts page says which inspector covers which townships of a county. Designers see the inspector for their site, and a report sent for review goes to the inspector of its township.
- Pick the County. The map shows its townships, coloured by district, with a list beside it.
- Click Add district and give it a Name (for example District 3 or North), a colour, an Inspector and Notes (optional).
- Click townships on the map (Shift-click, or turn on Select several, for more than one), or pick them in the list. Choose the district in Assign to and click Assign. Unassign takes them out of a district; Clear drops the selection.
The list says how many townships are unassigned. Select them picks them all. Who inspects here? finds the district and inspector of a township.
Show inspectors' email and phone to designers: when it is off, designers see the inspector's name, district and agency only. Print district map prints the county's map of districts.
Reviews
An agency's Reviews page is its inbox: the reports designers sent for review in its districts. A report goes to the inspector of the township's district.
Filter with All, My districts (when you cover districts), Open and Returned, and click Refresh to check for new ones. Each row shows the address, who sent it and when, the district, its inspector and the review's status. Your district marks the ones in your districts. Click a row to open the review.
See Plan reviews for how a review is marked up, signed and returned.