
General edit tools
The edit tools change features that are already on the map. They are in Edit tools, in the Tools drawer, next to the select tools.
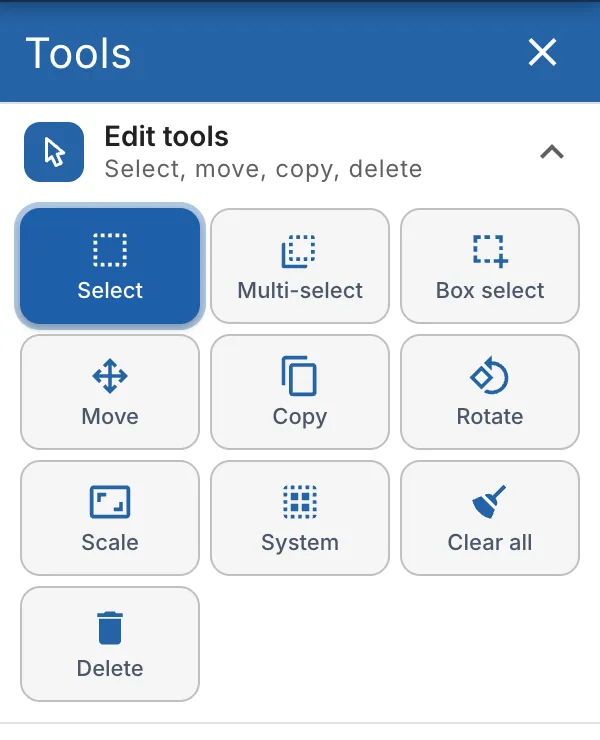
| Tool | What it does |
|---|---|
| Move | Drag features to a new place. |
| Copy | Copy the selected features into a layer. Shown when something is selected. |
| Rotate | Turn features around their centre. |
| Scale | Make features bigger or smaller. |
| System | Move or rotate a whole septic system as one. |
| Delete | Delete the selected features. |
| Clear all | Remove all the drawings from the map. |
Delete and Clear all are red, in a row of their own under the other edit tools, so they are not clicked by mistake for a tool next to them.
Every change can be undone with Undo in the toolbar, or Ctrl+Z (⌘+Z on a Mac).
Translate (move) feature
Move drags features to a new place on the map, keeping their size and shape.
- Click on the Move tool in Edit tools.
- Drag the feature to where it goes. To move several features together, select them first.
- Press Esc, or click Move again, when you're done.
A bed moves with its own parts: its bed sections, trenches, laterals, drip tubing and distribution pipes. The rest of the system stays where it is, so you can move one bed of a system on its own: the other beds, the distribution box, manifolds, mains and tanks only move when you select them too. A main or force main whose end is on the moved bed stretches to follow it, and a main with both ends on what you move moves with it.
The feature's outline snaps as you drag it: a tank brought up to the tank beside it settles edge to edge, and lines its corners up with it. Drag on past to let go.
To move a whole septic system, tanks and pipes included, use System instead.
Video from an older version
This clip was recorded in version 2.2.1, when the app was called NewSeptic and had a blue top bar. The toolbar, menus and panels look different today: follow the steps in the text.
Copy feature
Copy makes a copy of the selected features in a layer you choose, for example a second tank of the same shape.
- Select the feature with Select.
- Click Copy in Edit tools, or press Ctrl+C (⌘+C on a Mac). The Paste feature window opens.
- Choose the layer to paste into. It must hold the same kind of feature: a point, a line or an area.
- Click Paste.
Tick Slightly move the new feature to prevent overlap with original feature to see the copy beside the original. You can paste the copied features again later with Ctrl+V (⌘+V).
The Copy tile only shows while something is selected. You can also right-click a feature and choose Copy feature from its actions.
Rotate feature
Rotate turns the selected features around their centre.
- Click on the Rotate tool in Edit tools.
- Click the feature to select it. A box with handles appears around it.
- Drag the round handle to turn it.
- Press Esc, or click Rotate again, when you're done.
Video from an older version
This clip was recorded in version 2.2.1, when the app was called NewSeptic and had a blue top bar. The toolbar, menus and panels look different today: follow the steps in the text.
Move or rotate a whole system
System moves or rotates a septic system as one unit: the bed, trenches, laterals, pipes, bed sections, tanks, distribution box and mains.
- Click on the System tool in Edit tools, then click any part of the system. Or right-click a part, open its actions and choose Select whole system.
- Drag any part of the system to move all of it.
- Drag the round handle at the corner of the box to rotate all of it.
- Press Esc, or click System again, when you're done.
Sizes and shapes don't change, and nothing is redrawn. Elevations and the nearest soil test are updated once the move ends. The sewer main and the building stay where they are.
Scale feature
Scale makes the selected features bigger or smaller.
- Click on the Scale tool in Edit tools.
- Click the feature to select it. Handles appear on its corners and sides.
- Drag a handle to resize it.
- Press Esc, or click Scale again, when you're done.
To set an exact size, change the feature's sizes in the Properties tab instead.
Video from an older version
This clip was recorded in version 2.2.1, when the app was called NewSeptic and had a blue top bar. The toolbar, menus and panels look different today: follow the steps in the text.
Delete features
Delete removes the selected features from the map.
- Select the features with Select, Multi-select, Box select or System.
- Click Delete in Edit tools, or press Delete. The Delete tile stays grey until something is selected.
You can also right-click a feature and choose Delete feature, or use Delete feature in the ⋮ menu of the Properties tab.
When you delete a bed, landplan.io first asks whether to keep the system's data and whether to delete the features linked to it. Cancel deletes nothing. If you delete something by mistake, click Undo.
Clear all
Clear all removes all the drawings from the map, so you can start over.
- In Edit tools, click More, then Clear all….
- The window asks Clear all drawings? Type the map's name (or clear when no project is open), then click Clear all drawings.
It removes every feature from the layers you draw on, the Edit Layers, and says how many were cleared. The basemaps and data layers stay. Use it with care: to remove only some features, select them and use Delete.