
Smart Design and Auto Design
landplan.io designs the septic system on the map in two ways:
- Smart design works with you step by step. It reads the parcel, the soil tests and your configuration's rules, ranks the systems that fit, and then you place the house, tanks, system and pipes one at a time, or let it place each one for you.
- Auto design does the same work in one press: it picks the system that fits and drafts the house, tanks, pipes and report PDF for you to check.
Both open from Design on the map toolbar. You may have seen them called Guided design and Design it for me for a short while; they are the same tools.
Everything it draws is an ordinary map feature, so you can still move or change any part with the map's tools. Every calculation also stays available in Details.
Watch Smart design
A two-minute video shows Smart design from start to finish, slowly, in four chapters. Pause it or go back at any point, and pick a chapter to jump to it. See how it works in the app plays the same video.
Open Smart design
Click Design (the magic wand) in the bar at the top of the map. With a project open, it sits next to Details and Print.

The button also shows how far the design has got:
- A ring fills as you place the parts.
- An amber dot means a step needs a look.
- A number badge counts the suggestions waiting for you. Click it to open the review.
You can also start Smart design or Auto design from:
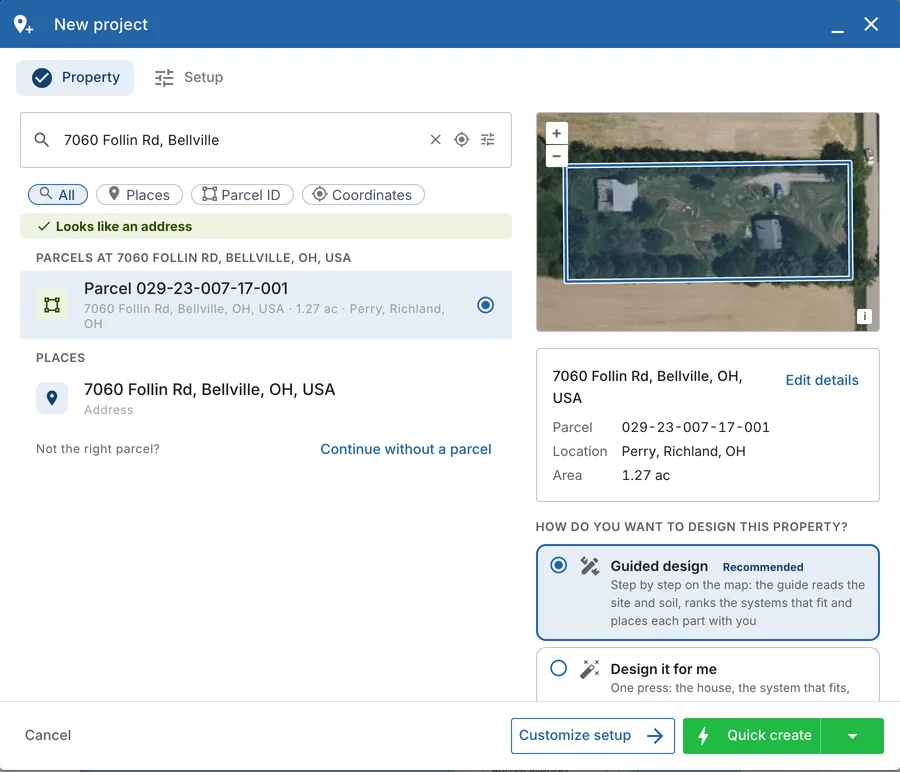
Create project. Once you pick the parcel, the New project window asks How do you want to design this property?: Smart design, Auto design or Blank map.
The projects list. Click Continue to pick up where you left off.
A right-click on the map. Choose Quick create and Auto design.
A soil boundary. Choose Design system in this soil boundary, or Auto design in this soil boundary.
The calculator. Click Guide (back to Smart design).
On a computer the panel opens in the Design tab on the right of the map, beside Tools and Properties; − folds it to a small button over the map. Press Esc to shrink the panel to a pill. Click Design again to bring it back.
On a phone
Design stays on the toolbar as an icon, and the panel opens as a sheet from the bottom of the screen, half its height, so the map stays in view. Tap the handle at the top of the sheet (or swipe it up) to see more of it, and tap it again (or swipe down) to bring it back. A swipe down from half height shrinks it to the pill.
Choose how to design
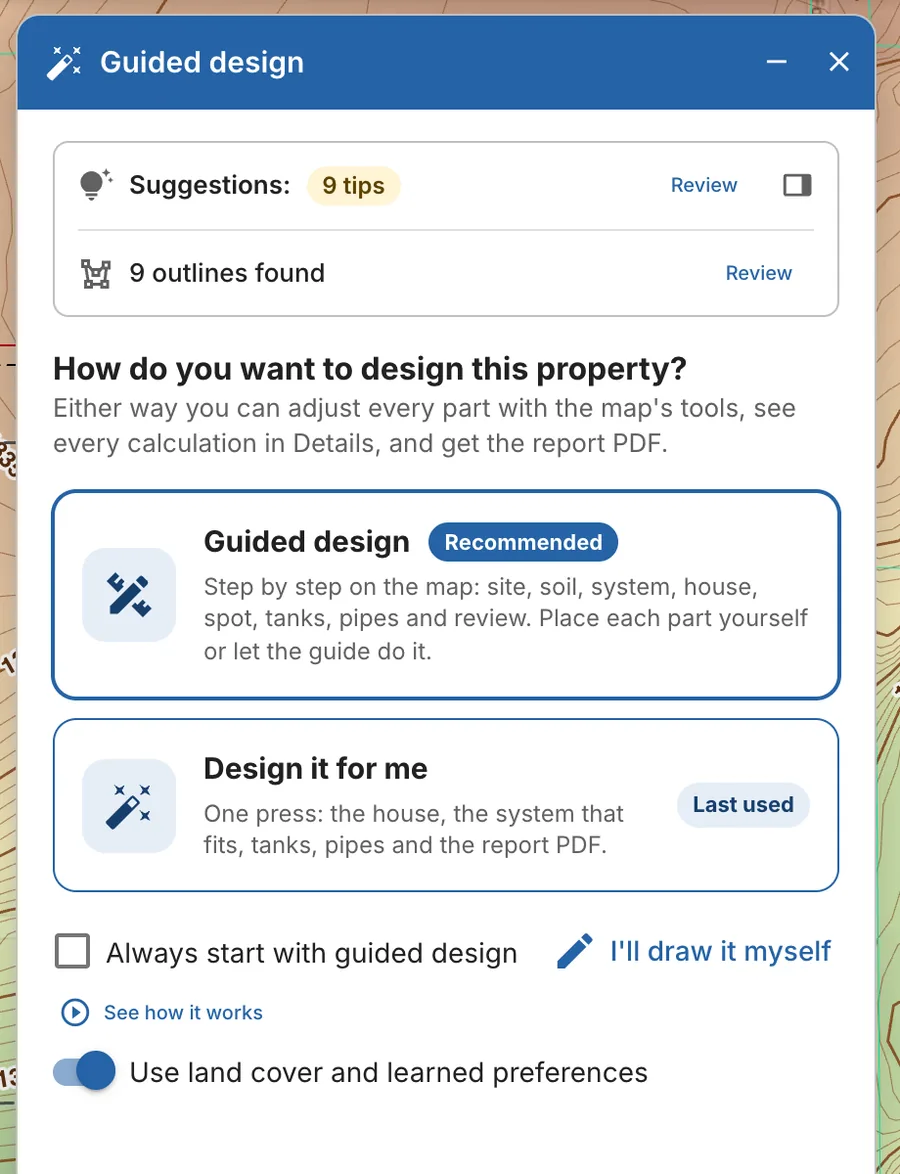
When the panel opens, it asks How do you want to design this property?
| Choice | What it does |
|---|---|
| Smart design (recommended) | Takes you through eight steps: site, soil, system, house, spot, tanks, pipes and review. At each step you place the part yourself or let Smart design place it. Needs an open project. |
| Auto design | Drafts the house, the system that fits, the tanks, the pipes and the report PDF in one press. Without an open project, it creates one from an address. |
| I'll draw it myself | Closes the panel so you can draw with the map's tools. |
The option you used last time is marked Last used. Tick Always start with Smart design to skip this screen from now on. See how it works opens a short video of Smart design in four chapters.
Use land cover and learned preferences (on by default) lets the guide use aerial land cover such as trees and paved areas, and the systems most often used in your state. It also turns on the suggestions.
You can switch modes at any time with the swap icon in the panel's title bar (Change how you design).
Smart design, step by step
The panel's title bar shows the step you are on under Smart design, for example Step 5 of 8 · Spot, and a thin line along its bottom edge fills in as you go, one piece per step: Site, Soil, System, Home, Spot, Tanks, Pipes, Review. A done step is white (green when the panel is in the right dock), a step that needs a look is amber and the step you are on is light blue. Click the step's name to see all eight steps, each with its state in words: Done, Needs a look or Now. A step done before its turn, such as a pipe drawn before the tanks, shows lighter. Pick Site in that list at any step to look at the site again: the panel shows the site notes (see below) and the back arrow returns to the step you are on. Pick another step to see its numbers in Details. Until every part Details needs is on the map, Smart design stays open: Soil shows the site notes too, and the other steps say what comes next. At the top of the panel, rows such as Suggestions, outlines found and Detections to review open what the guide found on the site.
Pick a system
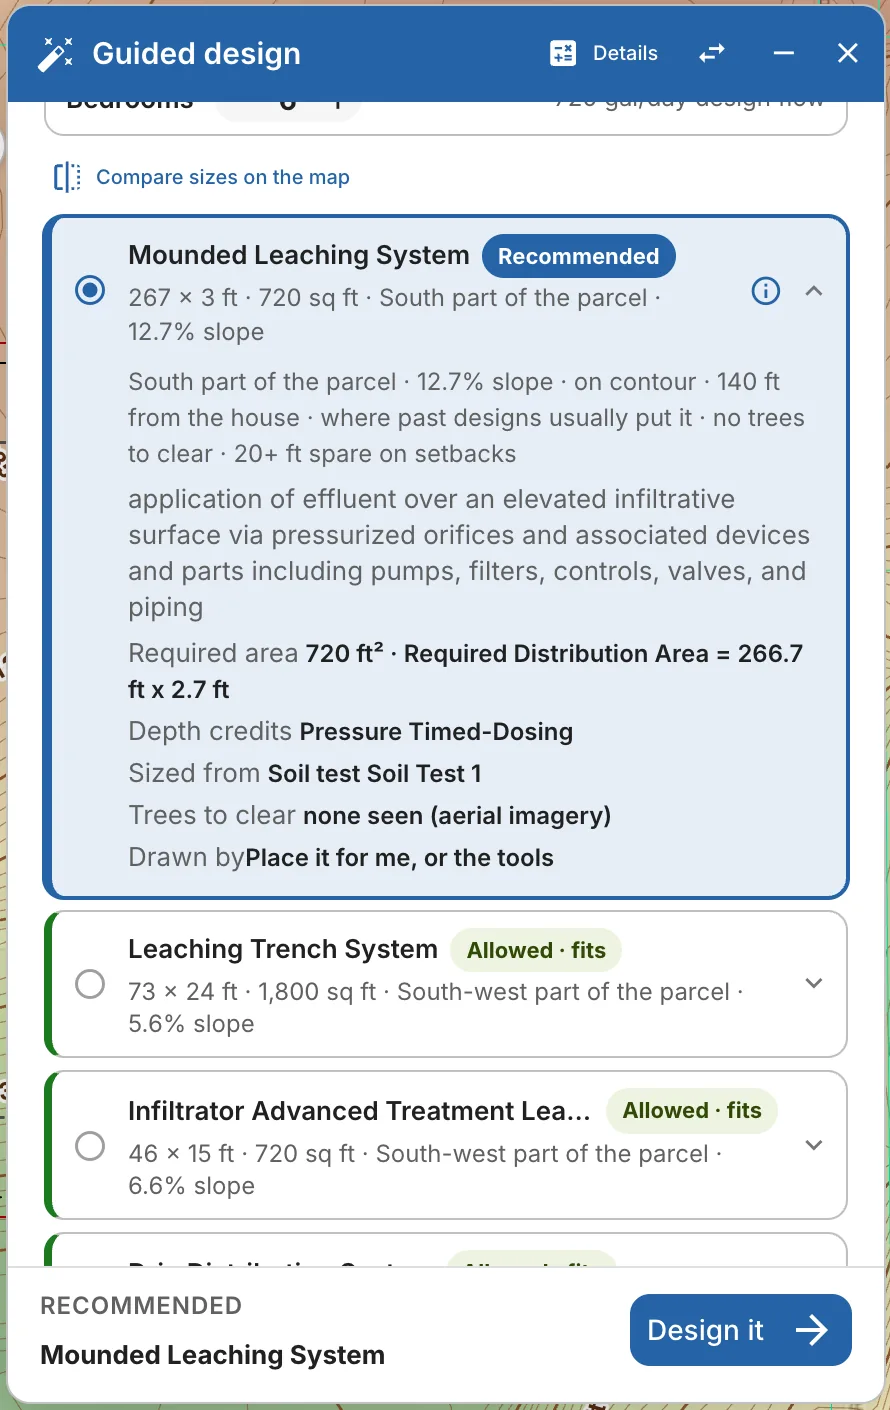
The guide reads the site and your rules, then lists every system your configuration has, sized from your soil tests. The systems that fit this parcel come first.
When a public sewer main is close enough that the house may have to connect, a warning shows above the list.
- Bedrooms. Change them with − and +. The design flow (gal/day) and every size update as you do.
- Compare sizes on the map. This draws each system's footprint on the parcel so you can see which fit.
Each system has a badge:
| Badge | Meaning |
|---|---|
| Recommended | The guide's pick for this site. Click the info button to see Why we recommend it. |
| Allowed · fits | The soil tests allow it and there is room for it on the parcel. |
| Allowed · tools | The soil tests allow it, but you draw it with the map's tools. |
| Allowed · no room | The soil tests allow it, but it doesn't fit inside the setbacks. |
| Allowed · soil too shallow | The soil tests allow it, but there isn't enough soil over the limiting condition for it here. A mound or a bed on sand can make up the separation. |
| Not allowed | The soil tests don't allow it. You can still design it with Design anyway. |
Each row gives the system's size and area, the part of the parcel it would go in and the slope there. Open a row to see why that spot was picked, its required area, depth credits, the soil test it was sized from, the trees to clear and how it is drawn. Choose a system and click Design it →.
Under the list, Why these systems: site notes holds what the guide found on the site. Closed, it names what is in it (for example Assumed soil values · 1 soil red flag · Water nearby) and how many need a look. Click it to open:
- The soil card. It shows the most limiting soil test. With no soil test, sizes use a default loading rate until you click Add soil data.
- Soil insights. Red flags from the USDA soil survey (NRCS), such as slow permeability or a high water table, each with what it means for the design.
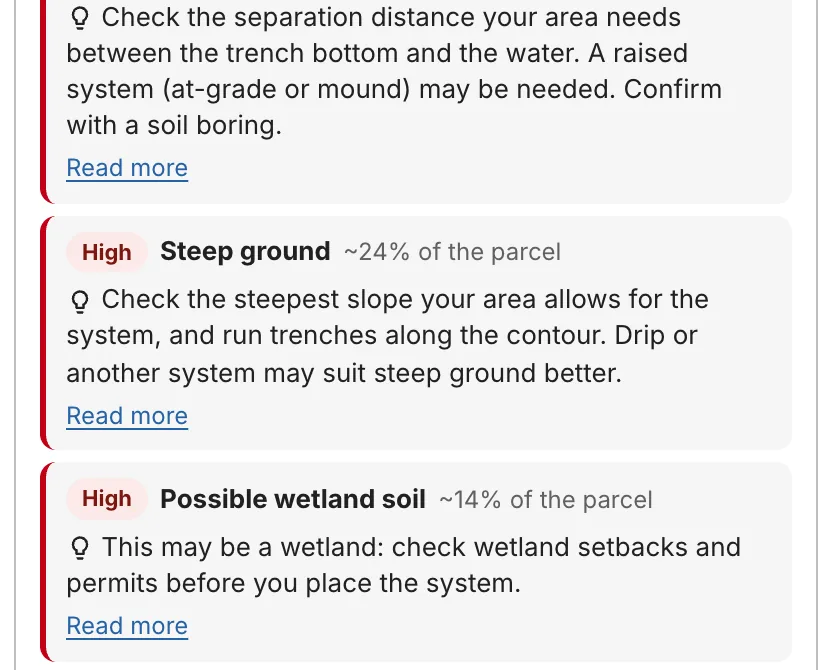
- Water on and near the site. Wells, streams, wetlands and water bodies.
- Public sewer. Where there is no sewer data, a line says the distance to a public sewer main was not checked.
- Check these: from aerial imagery. Paved areas and tree canopy seen in the aerial photo but not on the map. The guide keeps clear of them; check them on the map and draw the real ones.
- Past designs. When learned preferences are on, how past designs in your state ranked the spots and the systems.
Place each part
The panel now lists the parts of the chosen system in the order they are built. For a conventional trench system:
- Building With Flow (the house)
- Sewer main
- Tanks
- Trench
- Generate a conventional trench system
- Distribution method
- Force main (optional, only with a dose tank)
A mound has Generate a mound in place of the trench system and distribution method, and a spray system has no trench step.
In plain words, the parts are:
- The house, which sets the daily flow from its bedrooms.
- The septic tank, and any treatment unit or dose tank the system needs.
- The drain field (the absorption area): the trenches or the bed where the effluent soaks into the soil.
- The lines that join them: the sewer main from the house to the tank, the distribution, and the force main when the system is pumped.
At each step choose:
- Place it for me. The guide places the part by your rules and the site. For parts with products, such as the sewer pipe and the tanks, it also picks a product near the project, ranked by fit.
- Draw it myself. The part's own map tool opens. The panel shrinks to a bar showing the checks as you draw. Click Open guide to come back.
Once a part is on the map, its step shows:
- Move, to choose another spot (see Move a part).
- Locate, to zoom to the part.
- Undo, to go back to this step. This takes it and every step after it off the map.
If a system is already drawn on the parcel, the guide asks whether to Keep it, place beside or Delete it.
The house
The house step looks for buildings on the parcel. When there are several, it asks which is the house? and marks the likely one.
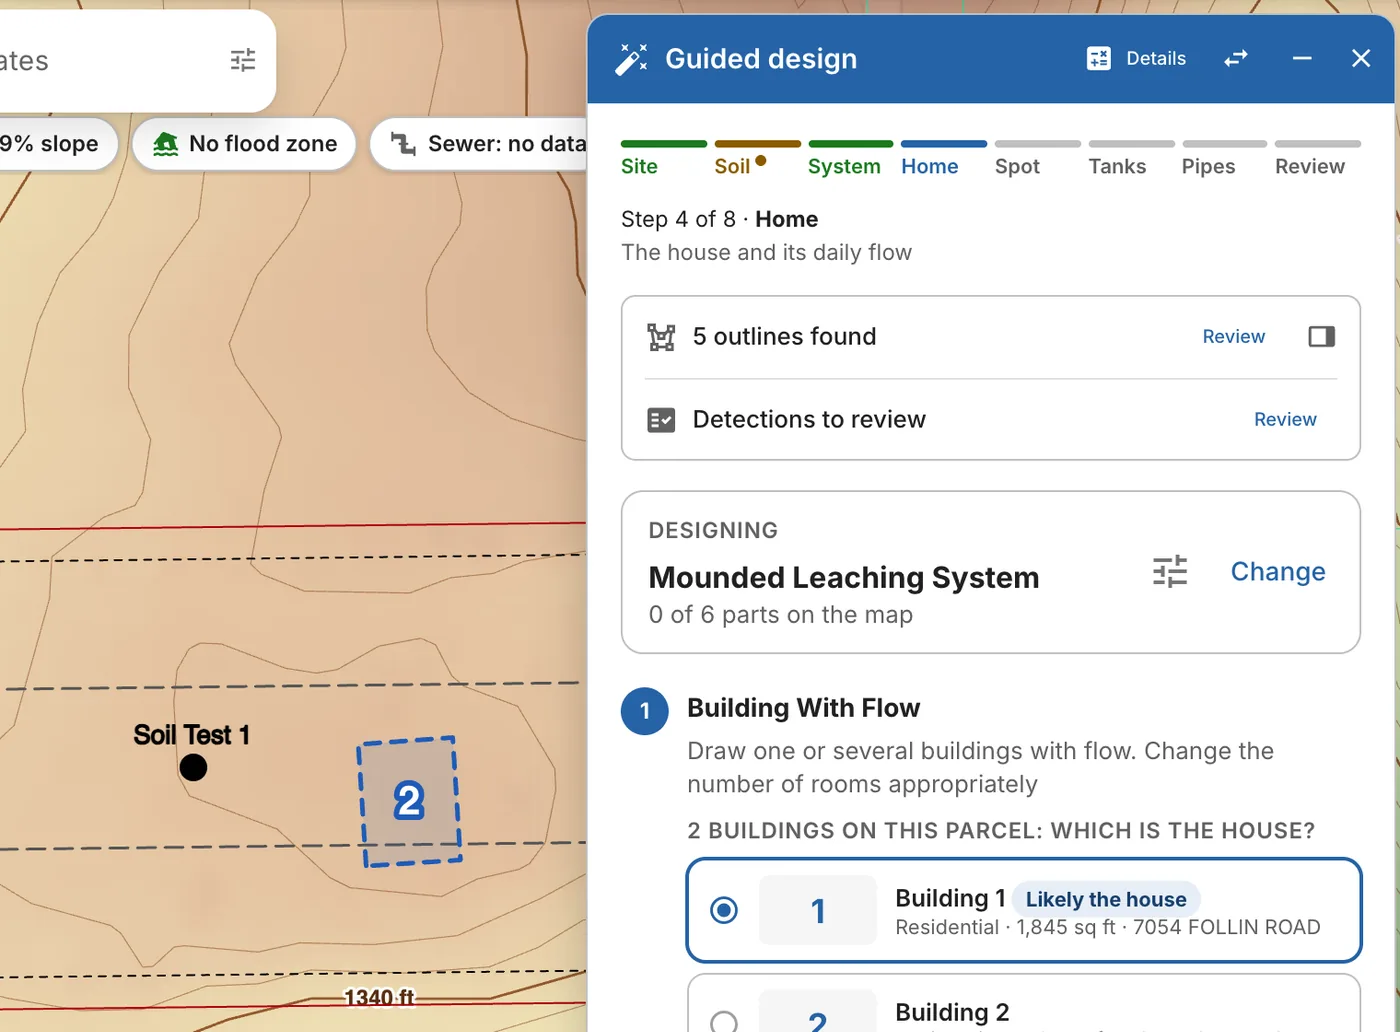
When there is no building, click Browse designs to place one of the common house designs. You can filter them by stories and size. Place it where the house is or will be, and move it later if you need to.
If the sewer leaves the basement, tick The sewer leaves the basement and enter the depth in feet below grade. The building sewer otherwise starts 1.75 ft below grade.
The trench
Place it for me on the Trench step draws the trench line at the length the system needs, then lays it by these rules:
- Inside the setbacks. It stays inside the parcel by your property line setback and keeps every other setback: the house, other buildings, driveways and paved areas, isolation features, wells, water, and the tanks and sewer main already drawn.
- Room from the parcel line. Where the parcel has room, it keeps 1.5 times the property line setback (15 ft for a 10 ft setback). Where it hasn't, it keeps the setback itself, and a note says so.
- Along the contour. The ground is read every 10 ft along the line. The line follows the contour when no two neighbouring readings differ by more than 0.25 ft. If no straight line on the site does, the guide draws the most level one and tells you how much the ground changes along it.
- Downslope of the tanks. The line goes below the tanks where it can, so the effluent runs to it by gravity. If only spots above the tanks fit, it goes there and a note says that a pump system will be required (a dose tank and a force main).
Your state can set its own values for the 1.5 factor, the 0.25 ft and the 10 ft.
Once a trench line is on the map, whether the guide placed it or you drew it yourself, the guide checks it. If it doesn't follow the contour, a warning under the Trench step gives the largest change between points 10 ft apart, for example The trench line does not follow the contour: the ground changes up to 0.8 ft between points 10 ft apart along it (0.25 ft at most), 8 ft from end to end. Turn the line along the contour, or lay the trenches with the contour tool.
A discharging system
A discharging system has no absorption area: the treated effluent leaves at a discharge point. Pick Discharging System in the list (Allowed · tools), and the steps are, in order:
- Building With Flow, Sewer Main and Tanks, as for any system. The tanks go by the house. Add the treatment unit the discharge needs (an aerobic unit or a filter, and disinfection where your rules ask) with Create pretreatment system.
- Discharge point. Place it for me puts it on the bank of the nearest stream, ditch or storm sewer mapped within 800 ft of the tanks, sets what it discharges into and reads the outlet elevation there. If none is mapped, it goes to the ditch along the nearest road, and a note asks you to check there is one. Your state's rule on discharging systems is shown as a note (in Ohio, OAC 3701-29-06(F)(2)). Draw it myself opens the Discharge point tool.
- Force main or distribution main. Place it for me joins the last tank to the discharge point. When the effluent can run there by gravity (the tank's outlet, falling 1% along the pipe, stays above the outlet), it draws a distribution main. When it can't, it adds a dose tank after the tanks and draws a force main from it: pick the pump in Details.
Check the outlet elevation and the fall in Details > Elevations before you make the report.
Check and finish
When every part is on the map, the panel says All parts are on the map and lists the setback checks (x of N pass). Move anything that fails, then click Check again.
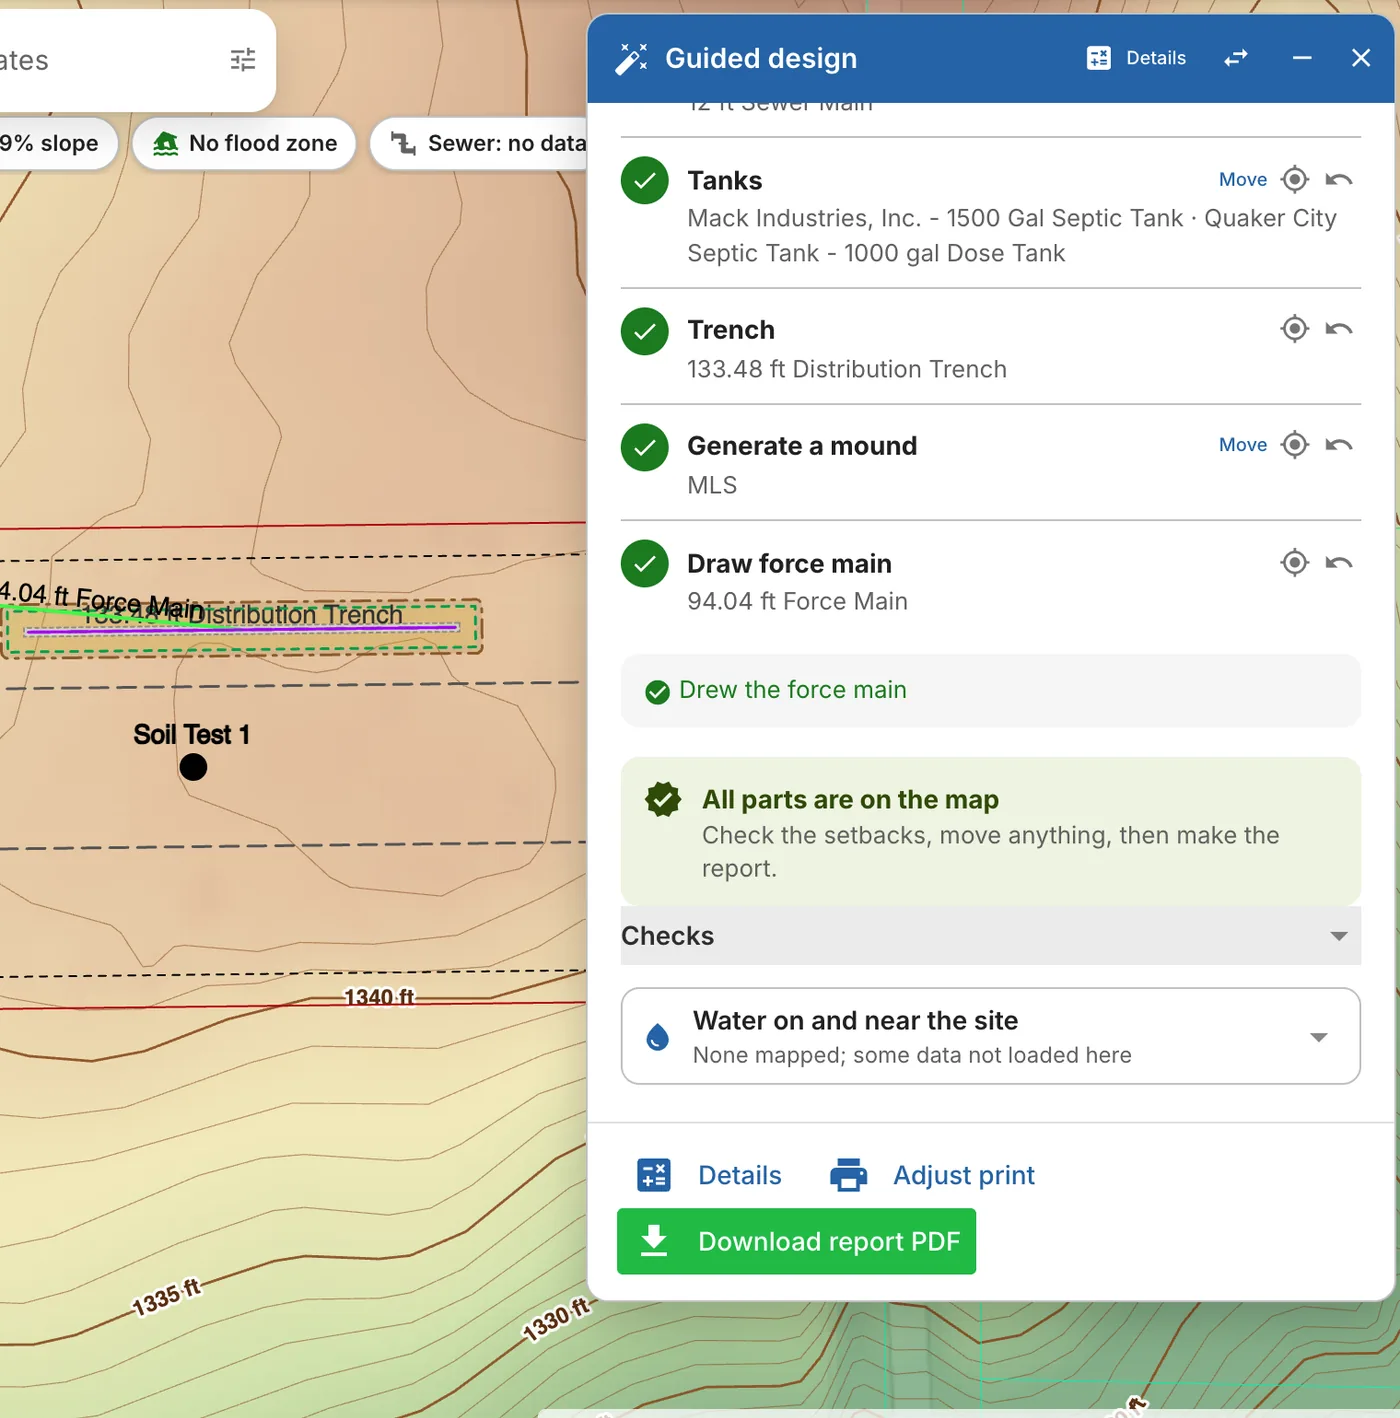
From the footer:
- Details opens the calculator with every number.
- Adjust print sets up the print layout.
- Download report PDF makes the report. It is available once every part is placed.
Auto design
Auto design drafts the whole system in one press. It takes about a minute, and the panel lists each stage as it goes: your rules, the parcel and site, the house and flow, the system that fits, the best location, the tanks, the drawing and the setback checks.
Video coming soon: Auto design. Until then, follow the steps on this page.
Start a new project from an address
With no project open, enter:
- Address. A street, town or parcel location. Pick one of the suggestions.
- Bedrooms. 1 to 12. The default is 3.
- System. Best for the site, or a system of your choice.
- Make the report PDF when it's done and Include the cost estimate. Both are on by default.
Then click Create project and design. The project is created at the address and the design starts as soon as the parcel is on the map.
Read the result
The result shows the system designed, the bedrooms and the design flow.
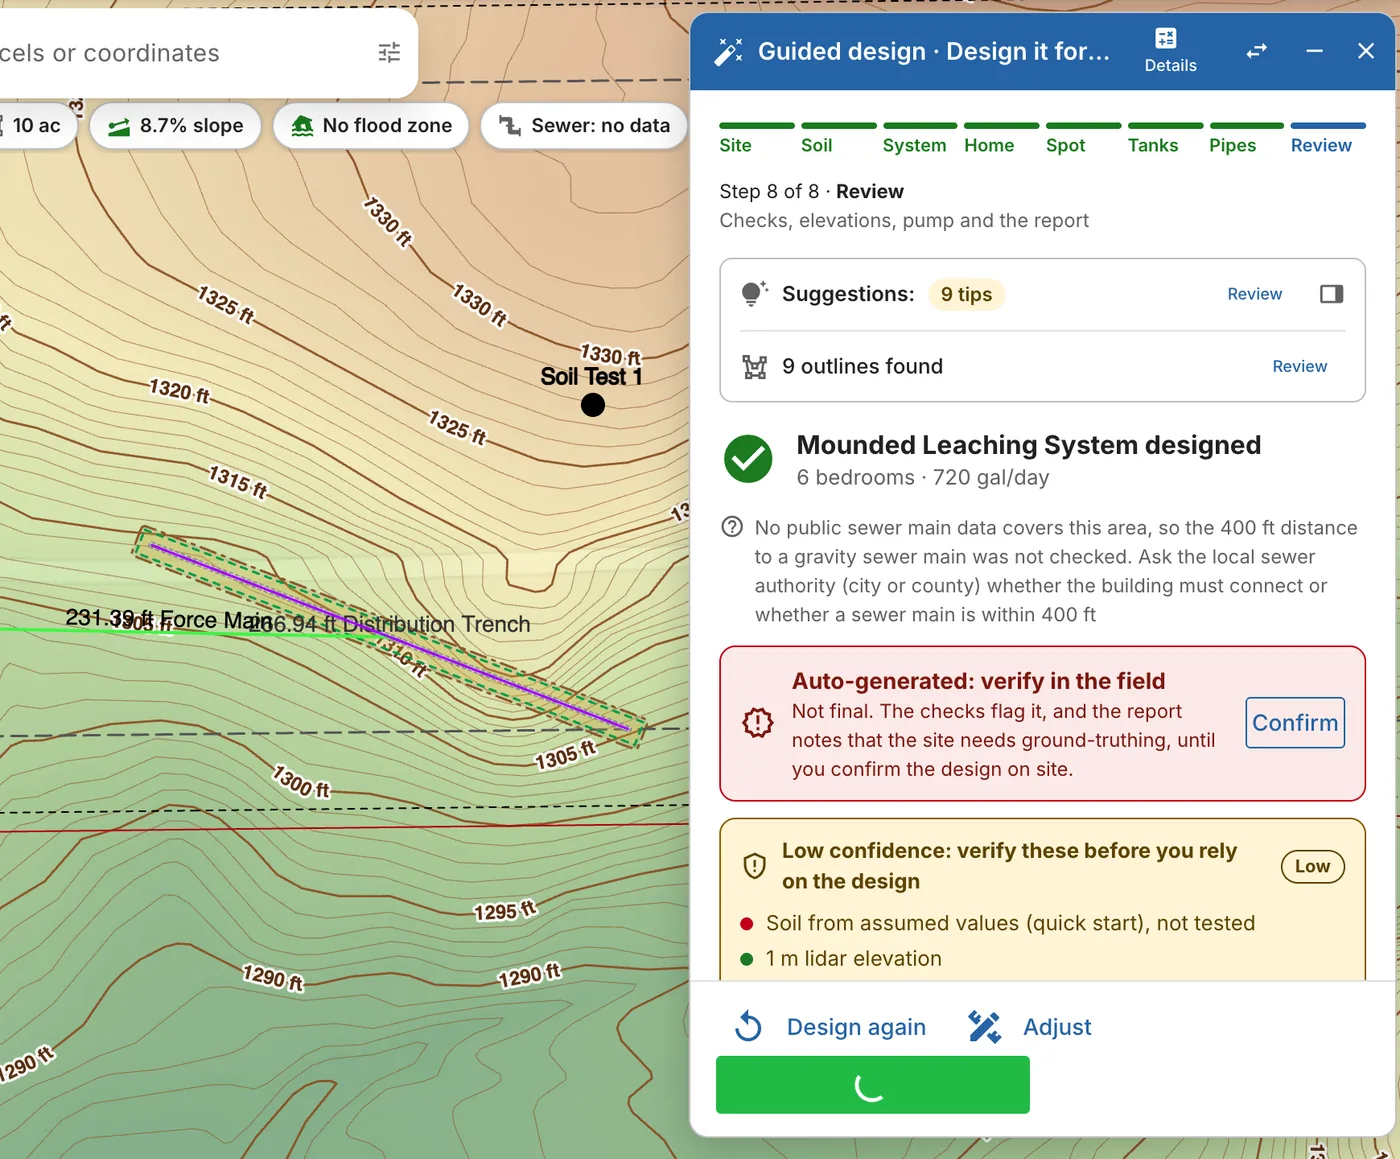
- Auto-generated design. A blue note: the design is a draft. Check it on site, then click Confirm. Until then the checks list it, and the report notes that the site needs a field check.
- Confidence. High, Medium or Low: how sure the guide is of the draft.
- Why this design. One row per decision (design area, system, house, design flow, placement, tanks, gravity or pump, and distribution), each with the reason it was made.
- Runner-up. The next-best system or area. Click Switch to use it instead.
- Checks. All N checks pass, or the ones that need a look.
- Water on and near the site. Wells, streams, wetlands and water bodies the guide found.
- The report PDF. It opens with Open when ready.
The footer has Design again, Adjust (opens the design step by step) and Download report PDF.
To take the draft off the map, click Undo: take this design off the map.
Change a decision
Click Change on a row of Why this design to change that decision. The design is redone with your change:
- System or Design area. Pick another one.
- Design flow. Set the bedrooms, then click Size and design again.
- House, Placement or Tanks. Click Move it or Show it on the map.
- Any row. Click Open it step by step to carry on in Smart design.
Move a part
Move (in either mode) lists other places for the part that meet every setback, lettered A, B, C.
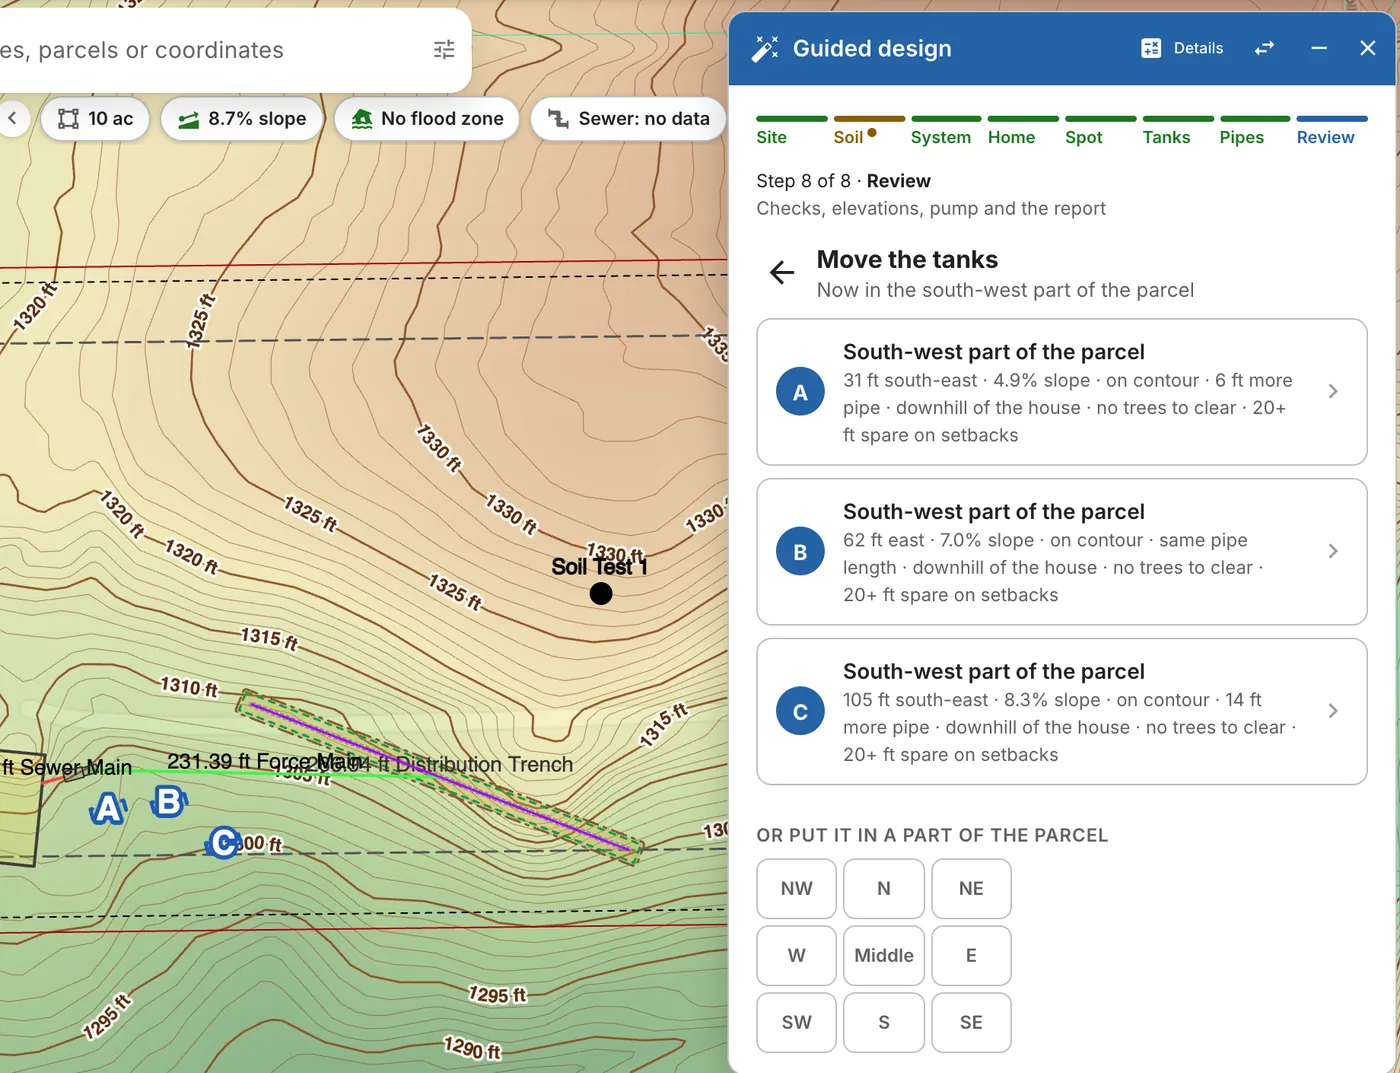
Each place says how far it is from where the part is now, the slope, how the pipe length changes and how much room is left on the setbacks. The letters also show on the map. You can also choose a part of the parcel with the compass (NW, N, NE ... SE), or click Move it myself on the map and drag it. When no other place meets every setback, the panel says so.
Suggestions and checks
With Use land cover and learned preferences on, the guide reviews the design and lists suggestions. The badge on Design shows how many there are.
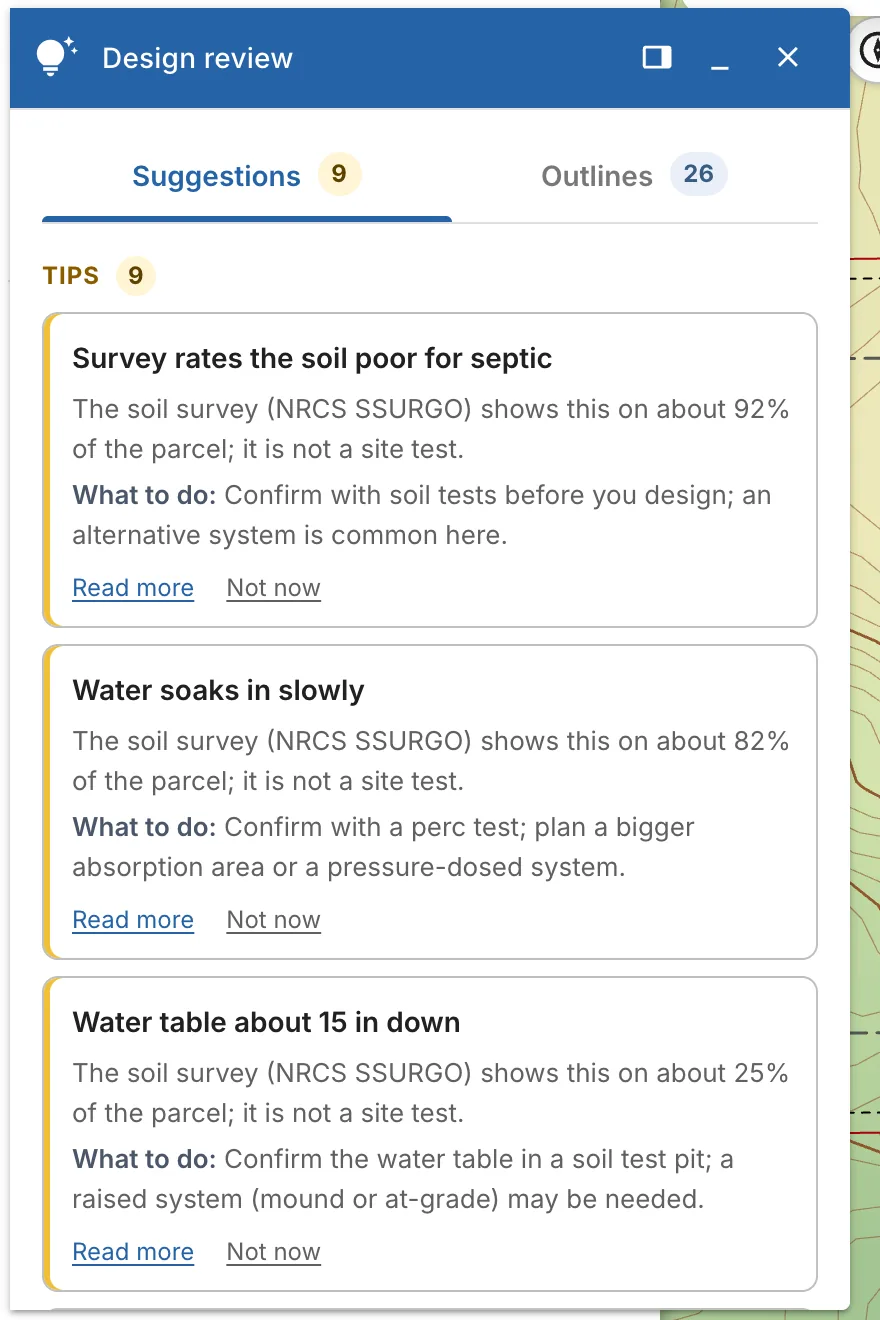
- Must fix items come from your area's rules, for example Move the absorption area away from the well or Use a bigger septic tank.
- Tips come from the soil survey and from past designs, for example Water table about 15 in down or Turn the absorption area to follow the contour. Each says what to do. Tips never block anything.
Click a suggestion's title to see it on the map. Many suggestions have a fix button such as Move it, Use a 1,250 gal tank or Add it. Click Undo to reverse a fix, or Not now to hide the suggestion.
When no place on the parcel meets every setback, a move fix moves nothing. It marks the place that comes closest with A on the map and says what that place still breaks, for example still 2 ft short of the perennial stream (48 of 50 ft). Click Move there anyway to use it, or Move it myself to drag the part on the map: its pipes follow it. Then click Check again.
The From photo tab lists the buildings, driveways, ponds and tree areas found in the aerial imagery that your map doesn't have yet. Click Add to put one on the map, or Wrong to dismiss it.
For everything in the review, its tabs and what the models behind it do, see Design Review.
When a design can't be made
| Message | What to do |
|---|---|
| This project has no parcel on the map | Add the parcel lines with the search, or draw the parcel, then try again. |
| No house on the map, and no room inside the property line setback for one | Draw the house (Building With Flow), or choose Use as residence on a building. |
| The {system} doesn't fit inside the setbacks | The message names what rules it out. Try another system, fewer bedrooms, or a smaller design area. |
| Your configuration has no {system} form | That system can't be generated from your configuration. Pick another, or draw it with the map's tools. |
| The {system} needs {L × W} ft; the largest open spot is {L × W} ft | Click a reason to see it on the map. Dismiss a reason from imagery, unconfirmed with its × if the imagery is wrong, and the part is placed again. Or click See options that fit, or Draw it myself. |
| Automatic placement couldn't place the {part} | Use Draw it myself for that part. |
| The report PDF could not be made | Click Try the report again, or open Details to see what is missing. |
When Auto design stops, the panel lists Why and What would fix it, with Try again and Smart design instead.
Tips
- Add a soil test first. Without one, every size uses a default loading rate and the design is marked preliminary.
- Check the setbacks the guide used. Any distance that didn't come from your configuration is listed under Check these.
- A design is never final until you confirm it in the field.