
Design Setup
Design setup holds how your new designs start: the products and design options of each system, the distributor your tanks and products are priced from, the contact block printed on your plans, and the prices your estimates use.
Everything saves as you go. There is no Save button for the whole page, and nothing you set here changes a design that is already on a map.
Open Design setup
Design setup is a page of its own, at landplan.io/setup. To open it:
- Open the app menu and choose Design setup (Products, options and prices your designs start with) under Account.
- On the map, click More actions (⋮) in the top bar and choose Design setup. This opens a smaller window for the systems only. See Design setup on the map.
Design setup is for members who design. A client or homeowner account doesn't have it.
The page has a side menu in four groups. On a phone, the same pages show as a row of tabs at the top.
| Group | Pages |
|---|---|
| (top) | Overview |
| Systems & products | Main distributor, Mound, Leaching trench, Low pressure pipe, Spray |
| Plans | Plan contact block |
| Pricing | Design prices, Price book, Labor & fees |
Each system in the menu has a small bar that fills as you make its choices.
The overview
Overview is the first page. It shows how far your setup has got, with a link to each page.
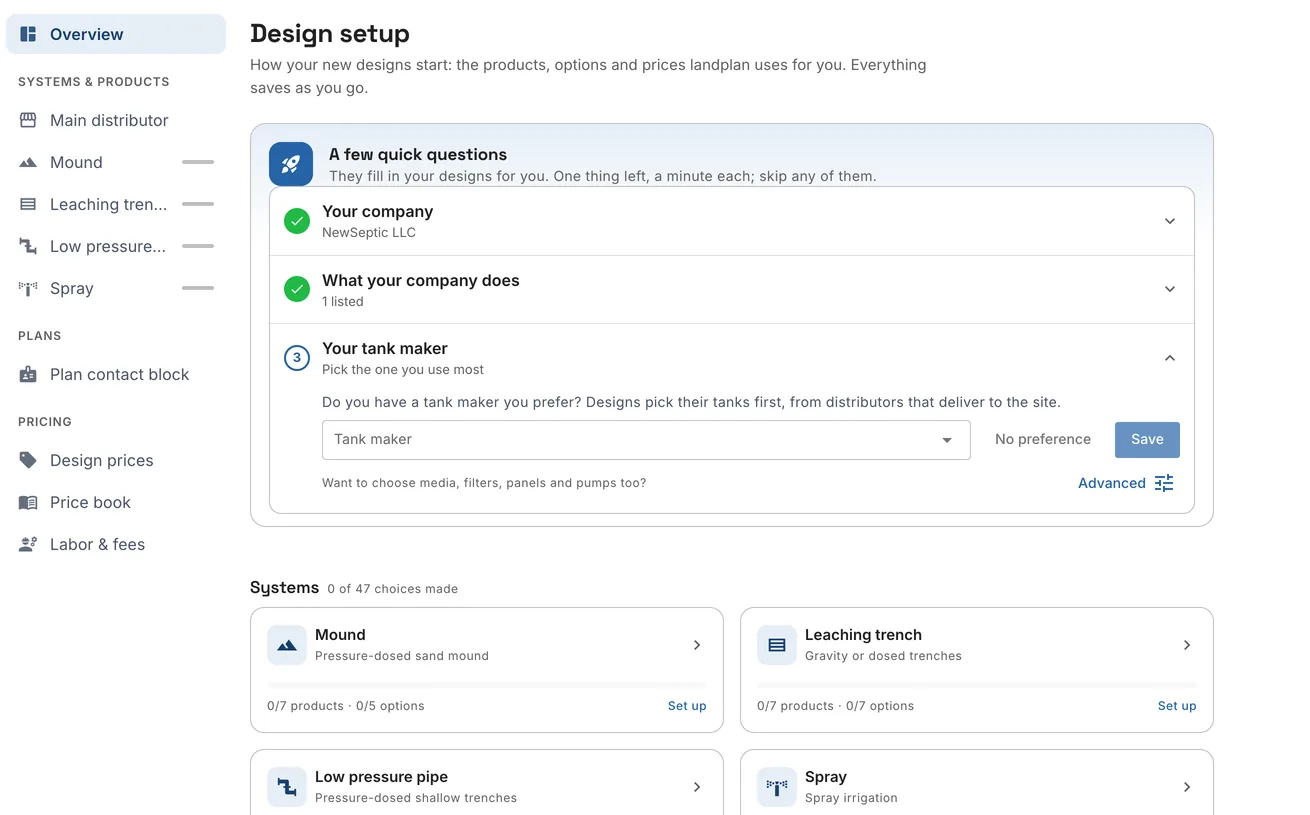
From top to bottom:
| Part | What it shows |
|---|---|
| A few quick questions | Your company, what it does and your tank maker. See A few quick questions. |
| Systems | A card for each system with the products and options set, for example 0/7 products · 0/5 options, and Set up, Continue or All set. Click a card to open the system. The heading counts all the choices made, for example 0 of 47 choices made. |
| For every design | Your Main distributor (Choose a distributor or Change) and your Plan contact block (Review or Edit). |
| Land intelligence in Design | A switch. When it is on, Smart design keeps paved areas, water and buildings seen in aerial imagery clear by your setbacks, and ranks the places your rules allow by what you chose before. It is kept in this browser, and each design can turn it off too. It only shows while the service is available. |
| Pricing | Links to Design prices, Price book and Labor & fees. |
A few quick questions
At the top of the overview, A few quick questions asks three things that fill in your designs for you. Each one takes about a minute, and you can skip any of them. Click a row to open it.
| Question | What you do |
|---|---|
| Your company | Type your company's name. Click I work here to ask its admin to confirm you, or It's my company to claim it (landplan.io checks your work email, or our team confirms it). Not listed? Click Add my company. If you work alone, click I work on my own; Ask me again undoes it. |
| What your company does | Tick the services your company provides, then click Save services. Only the company's admins can change them; for anyone else the row just shows them. |
| Your tank maker | Shown to installers. Pick the tank maker you use most and click Save, or click No preference. Designs pick their tanks first from distributors that deliver to the site. |
Each row shows where it stands: a tick when it's done, an hourglass while someone else has to act (for example Waiting for approval from your company), a dash when you skipped it.
Advanced opens the system pages, to choose media, filters, panels and pumps as well. When everything is answered, the card reads You're all set.
The same questions can also show as a small card in a corner of the app. Not now hides it for 7 days, and Don't show this again hides it for good. Your answers are kept with your account, so they hold on every device.
Systems and products
Each system has its own page: Mound, Leaching trench, Low pressure pipe and Spray. A page has two parts, Products and Design options. Each choice saves the moment you make it.
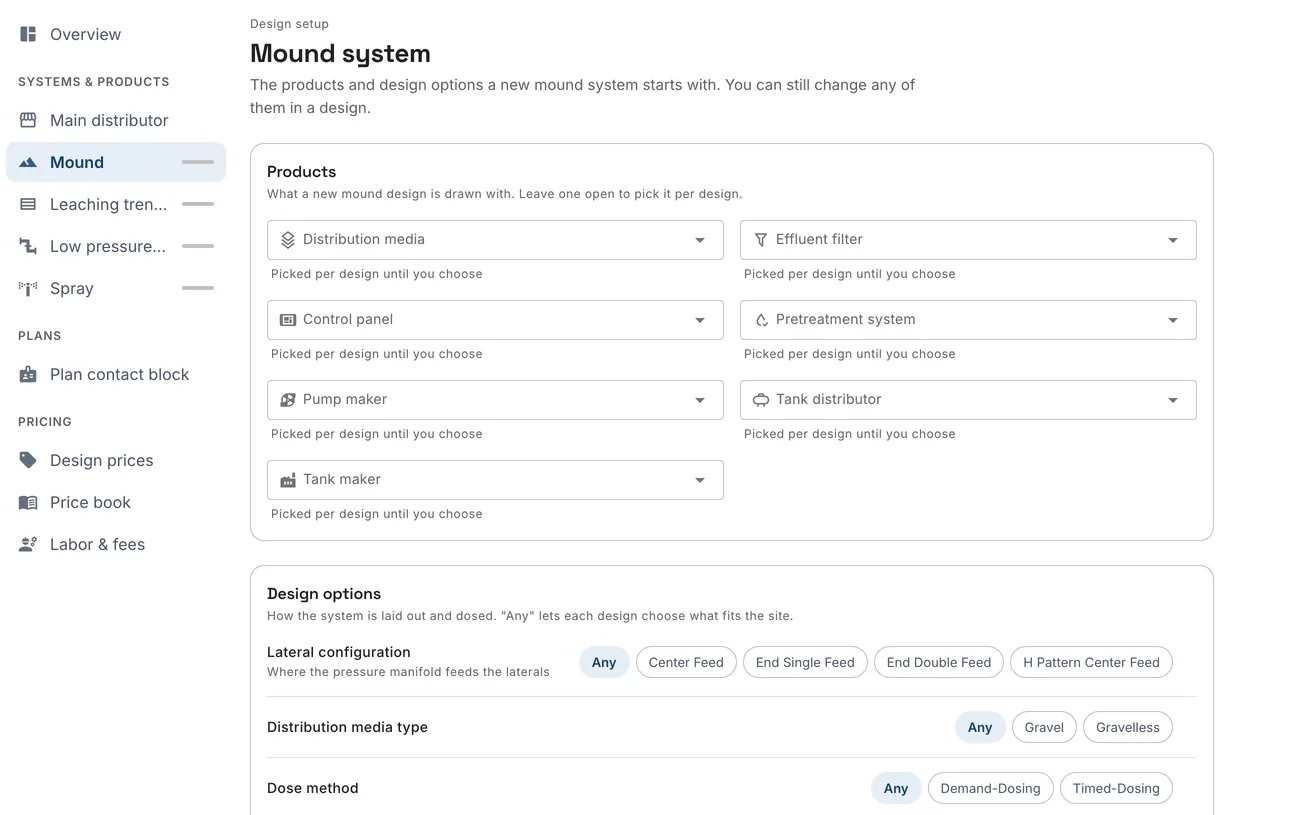
Products
Products are what a new design of that system is drawn with: for example the distribution media, effluent filter, control panel, spray head, pretreatment system, pump maker, tank distributor and tank maker. The list depends on the system.
Click a box and type to search the products and companies listed for it. Under each box you see:
- Picked per design until you choose: there's no default yet, so each design picks one.
- Set Oct 11, 2026: the date you chose it.
- Saved, for a moment after you change it.
Clear a box (the ✕) to go back to picking it per design.
Design options
Design options set how the system is laid out and dosed. Any lets each design choose what fits the site.
| Option | Systems | Choices |
|---|---|---|
| Lateral configuration | All four | Any, Center Feed, End Single Feed, End Double Feed, H Pattern Center Feed |
| Distribution of effluent | Leaching trench | Any, Sequential, Parallel |
| Distribution media type | Mound, Leaching trench, Low pressure pipe | Any, Gravel, Gravelless |
| Trench width | Leaching trench, Low pressure pipe | Any, or a width from the list |
| Orifice diameter and Lateral diameter | Low pressure pipe | Any, or a size from the list |
| Dose method | Mound, Leaching trench, Low pressure pipe | Any, Demand-Dosing, Timed-Dosing |
| Float switches | All four | Any, 2 Float - On, High water, 3 Float - Off, On, High water, 4 Float - Off, On, High water, Override |
| Always use pretreatment | Mound, Leaching trench, Low pressure pipe | A switch: designs start with the pretreatment system you picked under Products. |
| Use a distributing valve | Low pressure pipe | A switch: the laterals are zoned with a distributing valve. |
The buttons at the bottom of the page go to the previous and next system.
Design setup on the map
You can change a system's defaults without leaving the map. Click More actions (⋮) in the top bar and choose Design setup. In Smart design, the tune icon beside the system you are designing (Your default products and options for this system) opens it too, on that system's tab.
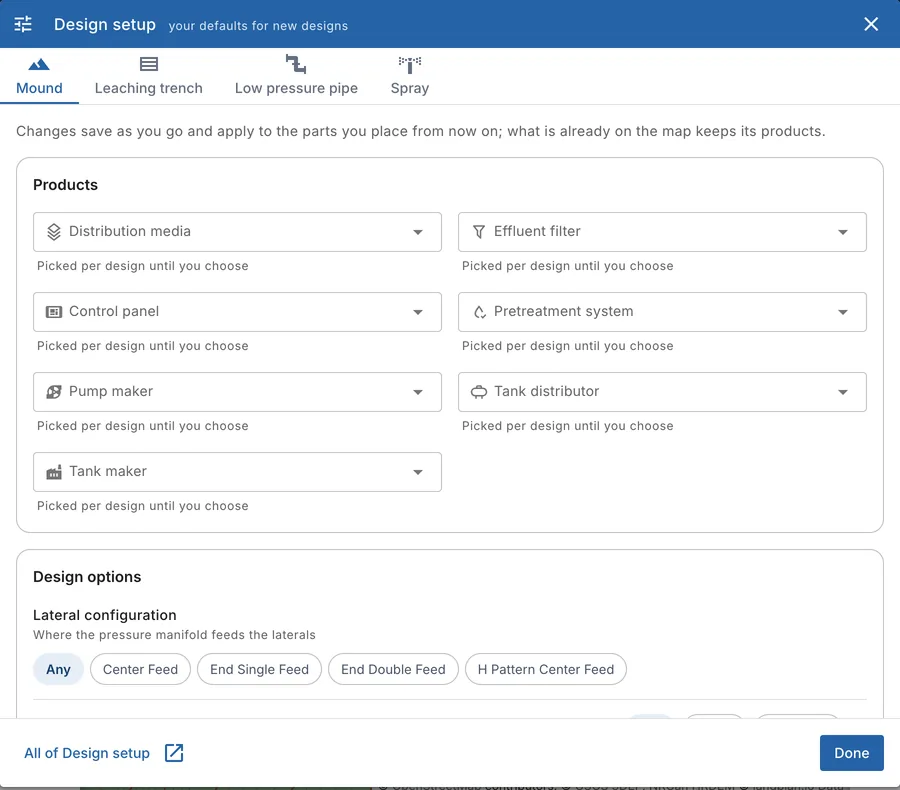
The window has a tab for each system (Mound, Leaching trench, Low pressure pipe, Spray) with the same Products and Design options as the system pages. Changes save as you go and apply to the parts you place from now on. What is already on the map keeps its products.
Click Done to close it, or All of Design setup to open the full page in a new tab.
Main distributor
Your main distributor is the supplier your tanks and products are priced from first, after your own prices. Tank pickers on the map list it first.
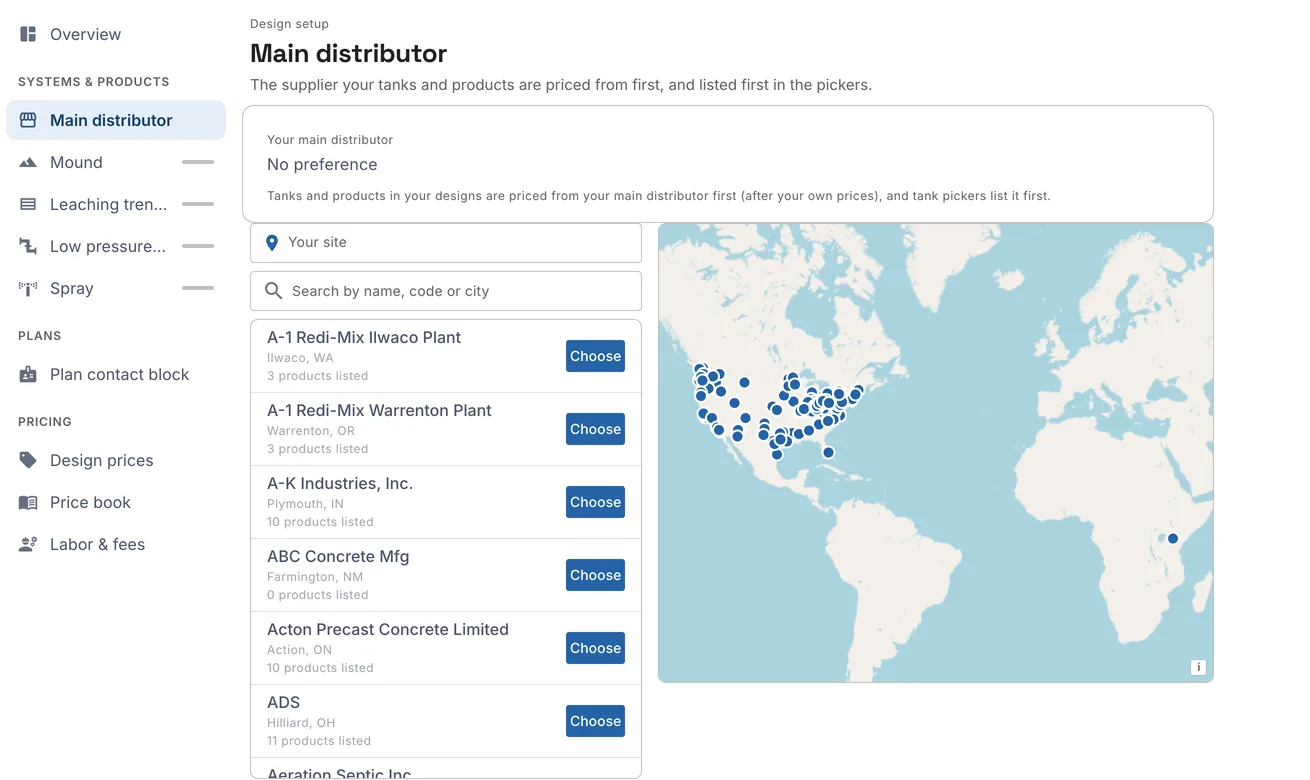
- Open Main distributor.
- Under Your site, pick a place to sort the distributors by distance. You can also type in Search by name, code or city.
- Click Choose beside a distributor. It shows at the top under Your main distributor, and its row reads Main.
A tick badge marks a verified distributor. The list shows the nearest ones; when it is long, Showing the nearest … asks you to search. Click Clear at the top to go back to No preference.
Plan contact block
The plan contact block says who designed the plan and how to reach them. It prints at the foot of every plan page and on cost estimates.
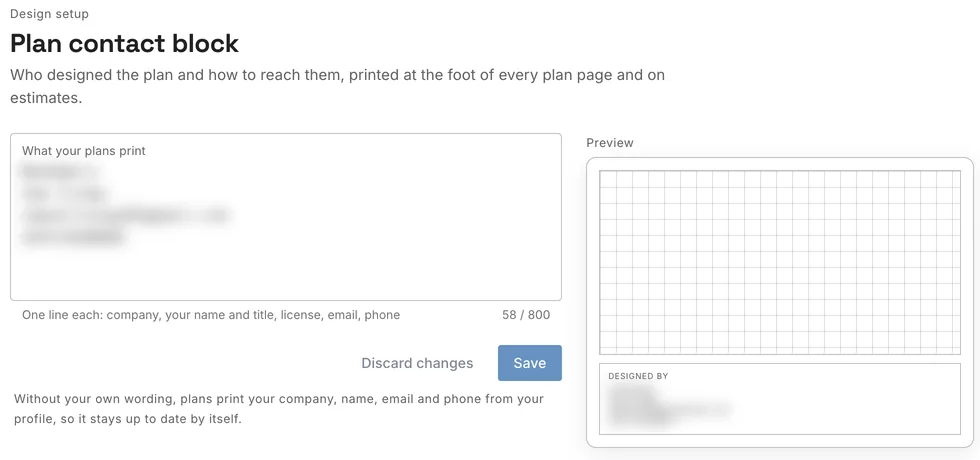
Until you write your own, plans print your company, name, email and phone from your profile, so the block stays up to date by itself. To write your own:
- Open Plan contact block.
- Edit What your plans print: one line each for the company, your name and title, license, email and phone. It holds up to 800 characters.
- Check the Preview beside it, then click Save.
Discard changes goes back to what you saved. Use my profile details puts back the block made from your profile.
Design prices
Design prices shows what estimates charge for each product in an area: the area's prices, with your company's and your own on top.
- Pick the Area. You can search with Search products, pipes, types.
- On My prices, type your price in the My price column for any item. Changed rows are tinted.
- Click Save prices. Discard drops the changes you haven't saved.
| Column | What it shows |
|---|---|
| Item | The product or pipe. A lock and Set by … mean your organization set the price and yours isn't used. |
| (Area) price | The area's price book price. |
| Organization price | Your organization's price, when you are in one. |
| My price | Your own price. Empty a price to use the one under it again. |
| Per | The unit the price is for. |
| Used | Which price an estimate uses. |
If you are in an organization, a second tab shows its prices. Only its members can change them. History lists the changes, with who made them and when.
If landplan.io doesn't price designs from the price books yet, a note at the top says so. Your designs keep using your area's configuration until then, and the prices you set are kept for later.
Price book
Price book holds your own price entries, and your own prices per distributor.
| Tab | What's on it |
|---|---|
| Price book | Your entries, grouped by product type, each with its price and unit. Click the pencil to change the price, or the bin to remove it. |
| My prices by distributor | The prices you set for a product at a distributor, with the picked-up price and the date. Each has History, Edit and Remove. |
| History | The changes to your price book. |
To add an entry, click Add an entry. On From distributor inventory, search a Distributor, then a Product in its inventory (leave the distributor empty to search every distributor). The product's name, SKU, distributor, type and listed price fill in. Set a Markup on the listed price, or type Your price directly, and click Add. For an item that isn't in the inventory, choose Custom product. Pick the Product type, give the Product (name) and, if you like, the Company and Material, then the price. Use Search products, distributors, materials and Product type to find entries.
You can also set a price from a feature on the map with Use as default: it lands here.
Edit the whole book (classic editor), at the bottom of the Price book tab, opens the older editor of the whole book. Click Save the whole book when you are done in it.
Labor & fees
Labor & fees holds the labor, fee and term prices your estimates start from, by state and county.
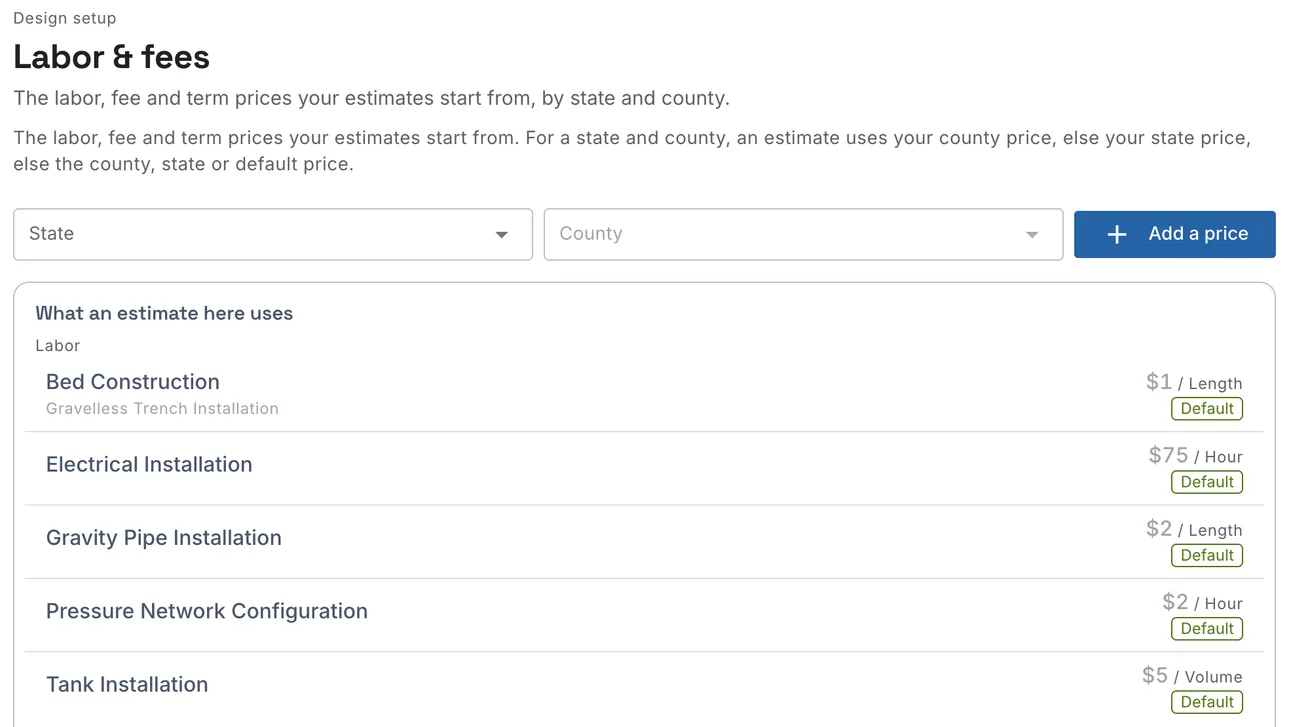
- Pick the State and, if you like, the County.
- What an estimate here uses lists each price, grouped by Labor, Fee and Term. A badge says where it comes from.
- Your prices lists the prices you set, with Edit and Remove.
For a state and county, an estimate uses the first price it finds in this order:
| Badge | Price |
|---|---|
| Your price for this county | Your own price for the county |
| Your price for this state | Your own price for the state |
| County default | landplan.io's price for the county |
| State default | landplan.io's price for the state |
| Default | landplan.io's price everywhere else |
To add one, click Add a price and fill in Work or fee (for example Trench, Tank set or Permit), the Kind (Labor, Fee or Term), the Labor type, the Price and what it is Per (hour, ft, each…), with a Description if you like. Then click Save.